Master How to Make a Quilted Tote Bag in Just a Few Steps
This post contains affiliate links. As an Amazon Associate, we earn from qualifying purchases.
To make a quilted tote bag, follow a three-part formula: cut your outer fabric and batting, quilt the layers together, then assemble the bag like a standard lined tote. The quilting adds structure, so you can use lighter-weight fabrics. A 1/2-inch seam allowance is standard, and you must account for fabric shrinkage after quilting, which can reduce panel size by up to half an inch.
The formula works because the batting acts as built-in interfacing. You are not making a quilt and then a bag. You are constructing the bag’s panels with the quilting as the first manufacturing step. This changes your fabric choices, your seam allowances, and your timeline.
What follows: the exact measurements from three proven patterns, the one tool that prevents puckering, how to handle post-quilting shrinkage, and the step everyone rushes that guarantees a wobbly bottom.
Key Takeaways
- Quilt your outer fabric to batting before cutting your final panel sizes. The quilting process can shrink your pieces by up to 1/2 inch, so trim everything to match afterward.
- Use a walking foot on your sewing machine. This $30 attachment feeds the top and bottom layers of fabric and batting at the same rate, eliminating puckers and skipped stitches.
- For structure without bulk, choose a thin cotton batting like Pellon Fusible Fleece or a double-sided fusible stabilizer. Avoid thick polyester battings for bags that need to hold shape.
- The assembly is identical to a standard lined tote bag. If you know how to sew a basic tote, you already know 80% of the steps.
- Boxed corners are non-negotiable for a useful bag. A 2-inch square cutout creates a 4-inch deep base, which is the minimum for holding books or a water bottle without tipping.
What is the Basic Formula for a Quilted Tote Bag?
All quilted totes break down into the same sequence. You work on flat panels first, then construct a three-dimensional bag. The variables are size, closure, and pocket layout.
The construction formula is a three-stage pipeline: panel creation (cutting + quilting), sub-assembly (straps, pockets, closures), and final assembly (joining exterior to lining, boxing corners). Each stage must be completed before moving to the next, as you cannot quilt a sewn tube.
Start with your desired finished dimensions. Add 1 inch to both the width and height for your initial cutting size. This accounts for a 1/2-inch seam allowance on all sides and a little breathing room for quilting shrinkage. Your batting should be cut to the same initial size.
For a simple 15-by-13-inch tote, you’d cut two exterior fabric rectangles at 16×14 inches and two lining rectangles at the same size. Your batting pieces are also 16×14 inches. This starting size comes from the Red Ted Art nine-patch tutorial, which yields a bag that fits a standard laptop.
The most common beginner mistake is cutting the final panel size first, then quilting. The quilting tension will pull the fabric, and your 15-inch panel becomes 14.5 inches. Now it doesn’t match your lining. You must quilt first, then trim all four panels (front, back, two linings) to the same size.
The 4 Tools You Actually Need (Beyond a Sewing Machine)
You can sew a bag with just fabric, thread, and a machine. But these four tools turn a frustrating fight into a smooth afternoon project. They address the specific physical challenges of sewing through padded layers.
- A Walking Foot. This is the single most important investment. A standard presser foot relies on feed dogs underneath the fabric to move it. With a slippery batting layer in the middle, the top fabric layer often stalls, causing puckers and uneven stitches. A walking foot has its own set of feed dogs that move in sync with the machine’s, gripping the top layer. It ensures all layers feed evenly. You can find a universal walking foot for most machines for under $40.
- A Denim or Jeans Needle (Size 90/14 or 100/16). You are piercing through two layers of fabric and a layer of batting. A universal needle (size 80/12) will bend, break, or cause skipped stitches. A denim needle has a stronger shaft and a sharper point to penetrate the dense sandwich without deflection. Switch to this needle after you’ve quilted your panels and are ready to assemble the thick seams.
- Clips, Not Pins. When pinning thick quilted layers, pins bend and create bumps. Clover Wonder Clips hold the edges securely without distorting the layers. They are also faster to remove as you sew. For attaching straps or aligning the final topstitching, they’re invaluable.
- A Clear Quilting Ruler and Rotary Cutter. Accuracy matters more after quilting. A clear ruler and rotary cutter let you trim your quilted panels to perfect rectangles in one motion. Scissors can wobble, leaving uneven edges that throw off your seam alignment.
If you’re moving from a simple sewing project like a basic tote, the walking foot and heavy needle are the two upgrades that make quilted work possible.
How to Choose Fabric and Batting: The Structure Trade-Off
Your fabric and batting choices determine the bag’s drape, weight, and durability. This is where most tutorials are vague. They are not interchangeable.
| Fabric Type | Best Paired With | Use Case | Risk If Mismatched |
|---|---|---|---|
| Cotton Linen Canvas (Home Dec Weight) | Thin Cotton Batting | Everyday tote, library bag, project bag. | Bag is overly stiff, difficult to turn right-side-out. |
| Quilting Cotton | Fusible Fleece or Mid-Loft Cotton Batting | Lightweight tote, purse, gift bag. | Bag lacks structure, collapses when empty. |
| Heavy Denim or Duck Cloth | No batting, or single-sided fusible interfacing. | Work tote, tool bag. | Seams become too thick for a home machine to penetrate. |
Batting is the key variable. It is not just padding; it is the structural core. * Cotton Batting: Low loft, dense. It provides flat structure without adding much squish. It’s breathable and easy to needle. This is the default for a structured tote. * Fusible Fleece (Pellon 987F): One side has adhesive. You iron it to the wrong side of your outer fabric. This bonds the layers before you ever sew, eliminating shifting. It adds moderate loft and is easier to handle than loose batting. * Polyester Batting: High loft, fluffy. It creates a puffy, “quilty” look but offers little support. The bag will slump. It also dulls needles faster. Avoid for bags that need to hold shape. * Double-Sided Fusible Stabilizer: A woven interfacing with adhesive on both sides. You iron it between two layers of fabric, creating a stable, thin panel. Zero loft, maximum structure. Ideal for creating a structured tote with sharp edges.
Where this goes sideways: Using thick polyester batting for a grocery tote. The bag bulges outward, can’t stand up on its own, and the handles pull awkwardly. The project feels failed before you’ve even finished it.
For a first bag, use quilting cotton and Pellon Fusible Fleece. The iron-on step is foolproof, and the result has a pleasant, slight cushion. If you want a crisp, canvas tote bag look, use canvas with a thin cotton batting.
The Quilting Process: Lines, Diamonds, and Staying Flat
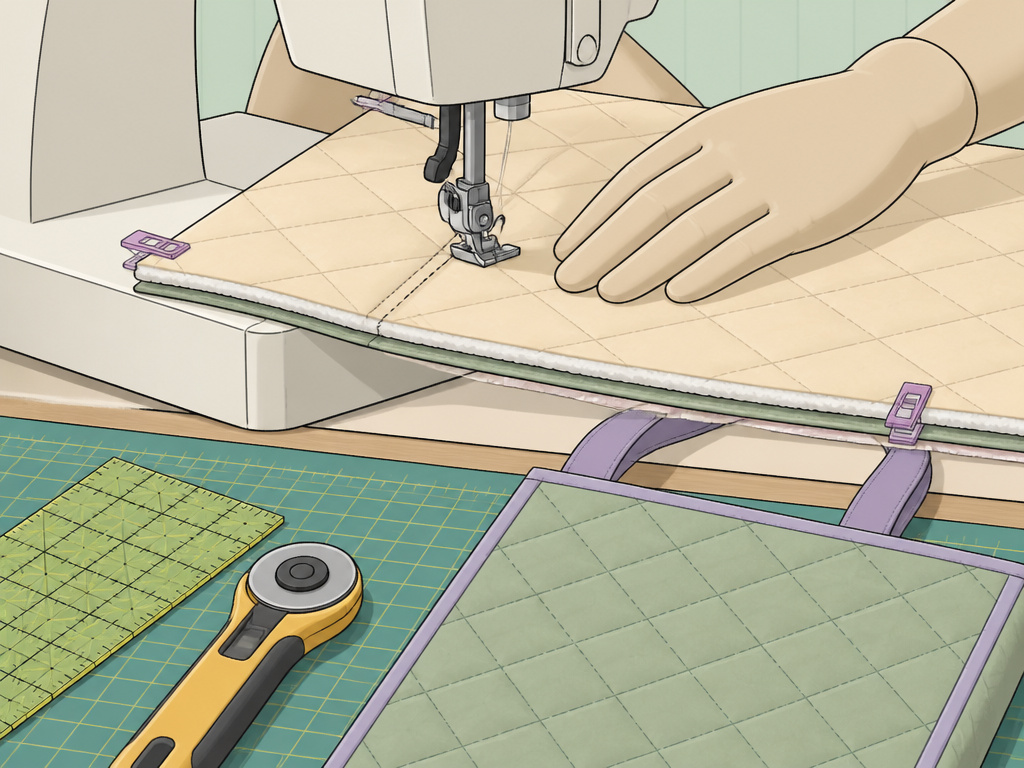
Quilting is simply sewing through the fabric-batting sandwich. The pattern you choose is decorative, but it also locks the layers together to prevent shifting over time. Do this before any bag assembly.
- Prepare Your Sandwich. Lay your batting piece down, then place your outer fabric on top, right side up. If using fusible fleece, iron it according to package directions. For loose batting, use a spray baste (like 505 Spray) or pin sparingly at the very edges.
- Start in the Center. Always begin your quilting lines in the middle of the panel and work outward. This pushes excess fabric toward the edges, where it can be trimmed, instead of creating a bubble in the center.
- Choose a Simple Pattern.
- Straight Lines: The easiest. Use the edge of your walking foot as a guide to sew parallel lines across the panel. Space them 1 to 2 inches apart.
- Diamond Grid: Sew parallel lines in one direction, then turn the panel 90 degrees and sew parallel lines in the other direction. This creates a grid of squares or diamonds.
- Stitch-in-the-Ditch: If your outer fabric is a pieced quilt block, sew along the seams between patches. This hides the quilting line and emphasizes the patchwork.
- Trim to Final Size. Once quilted, place your panel on your cutting mat. Using your ruler and rotary cutter, trim it to your exact finished panel size (e.g., 15×13 inches). Use this first panel as a template to trim the second exterior panel and both lining panels to identical dimensions.
This step is where the project becomes real. The fabric gains substance and texture. The time spent here ensures the rest of the tote bag sewing goes smoothly.
Assembly: It’s Just a Lined Tote Bag
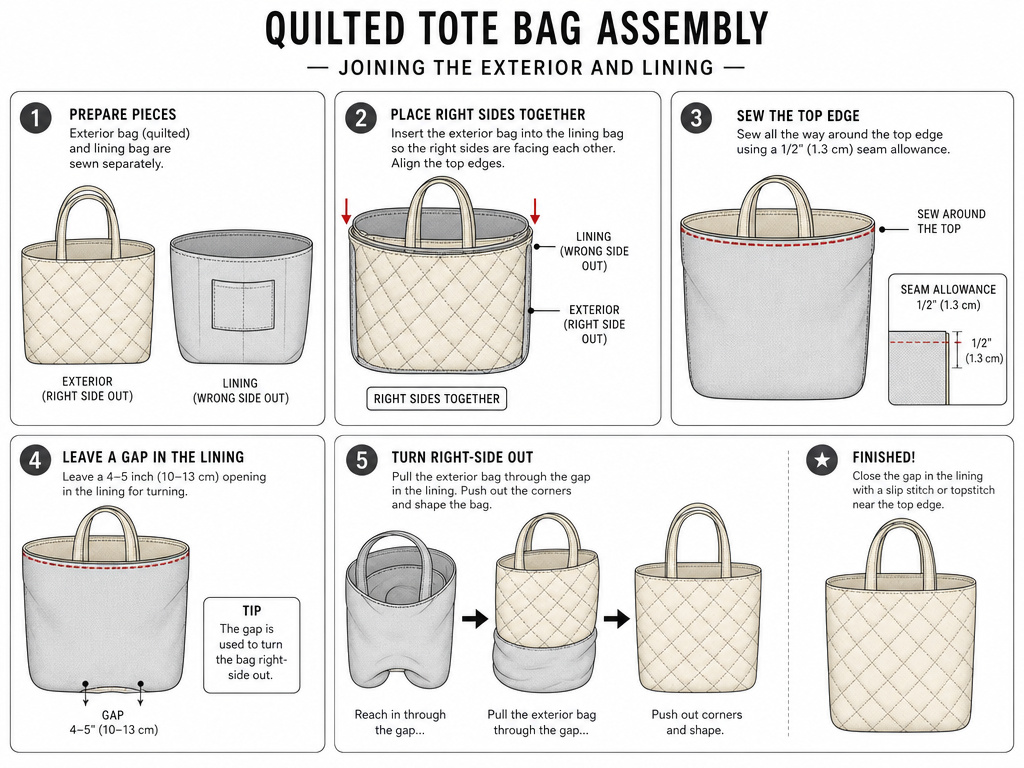
With your two quilted exterior panels and two lining panels ready, the hard part is over. You now assemble a standard lined tote. If you’ve ever followed a tote bag tutorial, the next steps are familiar.
- Make the Straps. Cut fabric strips 4 inches wide and your desired length (44 inches is standard for a shoulder tote). Fold lengthwise, right sides together, and sew along the long edge. Turn right-side out, press, and topstitch along both edges. For a quilted strap, sew a thin strip of batting inside before turning.
- Attach Straps to Exterior. Pin the raw ends of your straps to the top edge of the right side of one exterior panel. Standard placement is 3 inches in from each side. Baste them in place with a 1/4-inch seam.
- Sew the Exterior. Place your two exterior panels right sides together. Sew around both sides and the bottom, using a 1/2-inch seam allowance. Leave the top open. Do not box the corners yet.
- Sew the Lining. Place your two lining panels right sides together. Sew around both sides and the bottom with a 1/2-inch seam allowance, but leave a 6-inch gap in the center of the bottom seam. This is for turning later.
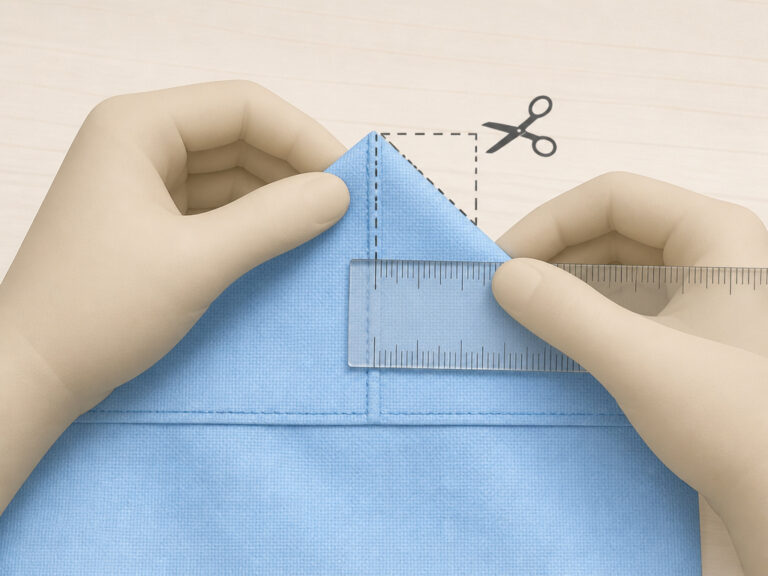
- Box the Corners. This creates the bag’s depth. Flatten the bottom corner of the exterior so the side seam aligns with the bottom seam, forming a point. Measure 2 inches from the point along the seam and draw a line perpendicular to the seam. Sew across this line. Repeat for all four corners (two on exterior, two on lining). Cut off the corner excess, leaving a 1/2-inch seam allowance.
The part nobody mentions: The size of the square you cut determines the bag’s depth. A 2-inch cut gives a 4-inch deep base. A 3-inch cut gives a 6-inch deep base. Want a shallow tote for just a notebook? Use a 1-inch cut.
- Join Lining to Exterior. Turn the exterior right-side out. Keep the lining wrong-side out. Slip the exterior inside the lining, so the right sides of the exterior and lining are facing each other. Align the top raw edges and side seams. Sew all the way around the top with a 1/2-inch seam.
- Turn and Finish. Reach through the 6-inch gap in the lining’s bottom seam, and pull the entire bag through it. You now have a right-side-out bag with the lining inside. Push the lining down into the exterior. Hand-stitch or machine-stitch the lining gap closed. Press the top edge. Topstitch around the entire top opening, about 1/8 inch from the edge. This secures the lining and gives a professional finish.
This assembly method is the same for a reversible tote bag or one with a secure tote closure. The quilting happens in the panel stage.
How to Size Up Any Quilt Block for a Tote
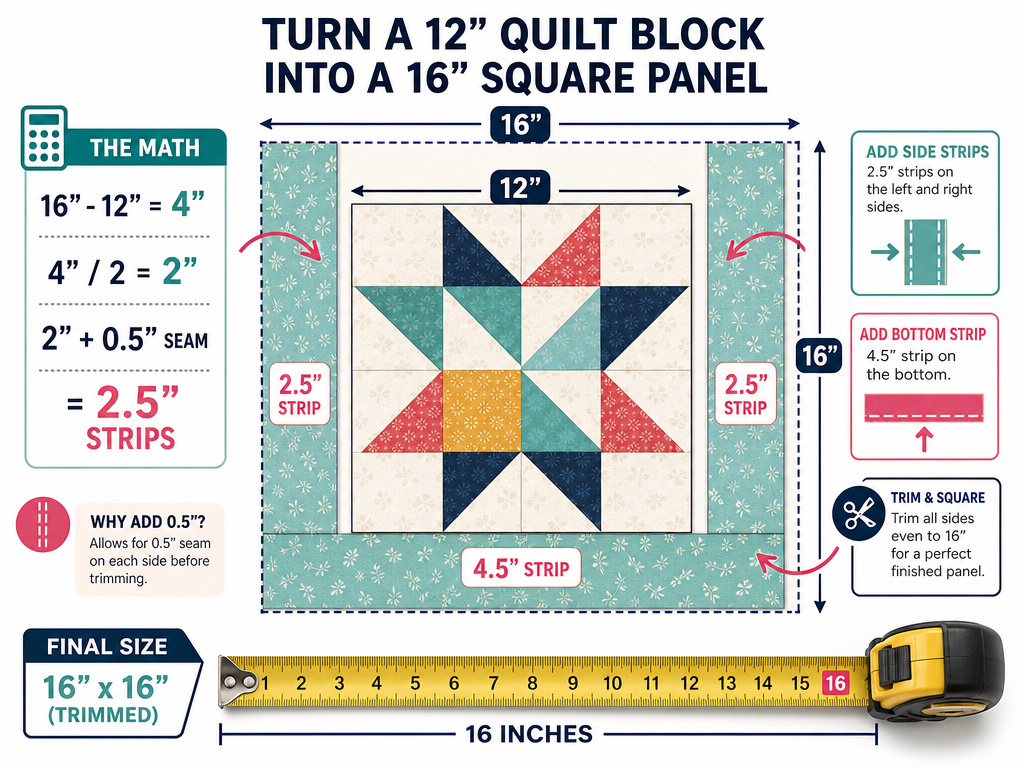
You have a beautiful 12-inch quilt block. Your tote panel needs to be 16 inches. You don’t need a new pattern. You add fabric strips to frame the block.
This technique from the Diary of a Quilter tutorial is a game-changer. It turns orphan blocks into custom bag fronts.
- Determine Your Needed Width. Subtract your block’s width from your desired panel width. Divide that number by two, then add 1/2 inch for seam allowances. Example: Desired 16″ – Block 12″ = 4″. 4″ / 2 = 2″. 2″ + 0.5″ = 2.5-inch strips for each side.
- Determine Your Needed Height. Often, you only need to add height to the bottom to avoid wrapping the block design around the corner. A good rule is to add at least a 3.5-inch tall piece to the bottom. Add 1/2 inch for seam allowance: a 4-inch tall strip.
- Sew and Trim. Sew the side strips on first, then the bottom strip. Press seams outward. Your block is now larger than needed. Trim the entire new panel down to your exact desired size (e.g., 16×16 inches).
This method preserves your quilt work and creates a one-of-a-kind bag. It’s more satisfying than starting from scratch and is a perfect next step after mastering a basic tote bag.
Frequently Asked Questions
Can I quilt a tote bag without a walking foot?
You can try, but the results are unpredictable. Without a walking foot, the feed dogs pull the bottom layer (batting) faster than the top fabric. This causes the top layer to ruck up and create small pleats or puckers behind the needle. If you must proceed, use a huge amount of basting spray, reduce your presser foot pressure if your machine allows it, and sew very slowly.
What’s the best batting for a structured tote bag?
For a tote that stands up on its own, use a thin, dense cotton batting or a double-sided fusible stabilizer. The Pellon 987F fusible fleece is an excellent middle-ground choice for beginner and intermediate bags. It provides light structure and is extremely easy to handle because it’s ironed on.
How much does quilting shrink the fabric?
It depends on the density of your quilting lines. With parallel lines spaced 2 inches apart, expect up to 1/4 inch of shrinkage per dimension. With a dense diamond grid, shrinkage can reach 1/2 inch. This is why the “quilt first, trim second” rule is non-negotiable. The Diary of a Quilter tutorial notes a specific panel shrank from 16.5 inches to 16 inches after quilting.
How do I clean a quilted tote bag?
Check the care instructions for your outer fabric and batting. Most cotton quilting projects can be spot-cleaned. For a full wash, use cold water on a gentle cycle and air dry. The agitation of a regular wash can cause the batting to bunch or shift inside its channels. For detailed care, refer to a guide on how to wash a tote bag properly.
The Bottom Line
A quilted tote bag is a lined tote where the interfacing step is replaced with decorative quilting. Success hinges on three things: using a walking foot, accounting for shrinkage by trimming after quilting, and choosing the right batting for the structure you want.
For a first attempt, follow the Melly Sews or Red Ted Art measurements exactly. Use quilting cotton and fusible fleece. The walking foot is the one tool purchase that makes the difference between a frustrating project and a finished bag you’ll use for years. Once you have the formula, you can adapt any simple tote bag guide into a quilted version, or customize your creation with embroidery or patches.