Learn How to Sew a Durable, Lined Tote Bag in Just 3 Steps
This post contains affiliate links. As an Amazon Associate, we earn from qualifying purchases.
To sew a tote bag, you need three things: a stable woven fabric (canvas, denim, or heavy linen), a consistent 5/8″ seam allowance for structure, and a method for creating a flat, boxed bottom. The process involves sewing an outer shell and a lining separately, boxing the bottom corners on both, then joining them at the top. Sturdy, well-attached handles are non-negotiable for a bag that lasts.
That 5/8″ seam allowance isn’t a suggestion. It’s the margin that keeps your seams from fraying open under the weight of groceries or library books. A quarter-inch seam on canvas will disintegrate after a few heavy loads. The allowance gives the fabric layers room to be finished cleanly inside a lined bag.
What follows is the method used in professional bag patterns like the Core Tote. We’ll walk through fabric selection, the sequential construction of shell and lining, the flat-bottom trick, and how to attach straps so they don’t tear out. This is for a bag you use, not one that sits on a shelf.
Key Takeaways
- Use a mid- to heavy-weight woven fabric like canvas, denim, or duck cloth. Quilting cotton is too light for a functional bag and will sag and wear quickly.
- Commit to a 5/8″ seam allowance and stick to it throughout. Inconsistent allowances cause misaligned corners and a lopsided bag.
- Interface your strap fabric if using cloth handles. Non-interfaced straps stretch and deform under weight, transferring all the stress to the attachment points.
- Topstitch with a longer 3-4mm stitch length and use a size 14-18 needle for heavy fabrics. A short stitch perforates the fabric like a dotted line, creating a weak point.
- The most common mistake is sewing the lining completely closed before remembering you need it open to turn the bag right-side out. Leave a 5-6 inch gap in the lining’s bottom seam.
Fabric & Tools: What You Actually Need
Your fabric choice decides whether this is a grocery bag or a landfill donation in six months. You need a stable, tightly woven fabric that doesn’t stretch.
Canvas and denim are the defaults for a reason. They have the heft to hold a shape and the durability to survive being dragged across pavement. A good 10-ounce canvas is ideal. Linen works if you want a softer, casual look, but it will wrinkle and lose structure faster. Bottom line: if the fabric feels flimsy in your hands, it will be flimsy as a bag.
Skip this if: You only have quilting cotton. That fabric is for quilts, not for bags that carry weight. It will stretch, the corners will pucker, and the straps will pull at the seams.
Your lining doesn’t need to be heavy, but it should be dark. A dark lining hides the dirt and crumbs that inevitably collect at the bottom. A light-colored lining shows every stain after two trips to the farmers market.
The tool shortlist:
- Sewing machine (a basic home model is fine)
- Size 14-18 machine needles (heavier fabric = bigger needle)
- All-purpose polyester thread for construction
- Heavier topstitching thread (or use two spools of all-purpose thread)
- Sharp fabric scissors or rotary cutter
- Iron and pressing surface
- Seam ripper (you’ll use it)
- Pins or fabric clips
- A point turner or blunt chopstick
The needle is critical. A size 14-18 needle pushes through multiple layers of denim or canvas without breaking or deflecting. Using a size 10 needle on canvas is a sure way to snap the needle, damage your machine’s timing, or create uneven stitches that skip.
The Seam Allowance That Holds Everything Together
Every pattern has a seam allowance. The most common for bag-making is 5/8″ (16mm). This isn’t arbitrary. A 5/8″ seam gives you enough fabric to enclose raw edges cleanly inside a flat-felled or French seam. It also provides extra material at stress points, like the top of the bag where the straps attach.
Some simple lined bag patterns use a 1/4″ or 3/8″ allowance. These are for lightweight projects. For a durable tote, the 5/8″ rule stands. Mark it on your machine’s throat plate with washi tape if you have to. Inconsistent sewing is the number one cause of a bag that twists.
| Fabric Weight | Best Use | Recommended Needle Size | Seam Allowance |
|---|---|---|---|
| Quilting Cotton | Light liner, pocket | 11/80 | 1/4″ |
| Linen, Light Canvas | Casual tote | 14/90 | 1/2″ – 5/8″ |
| Heavy Canvas, Denim | Durable everyday bag | 16/100 – 18/110 | 5/8″ |
| Upholstery Fabric | Structured, stiff tote | 18/110 | 5/8″ |
The Core Tote Construction Process
This is the sequence for a classic lined tote with a flat bottom. The logic is simple: build the outer shell, build the lining, join them, flip, and finish. Rushing the order is how you sew something inside out or create a bag you can’t turn right-side out.
Step 1: Cut your pieces.
You’ll need two rectangles for the outer shell, two identical rectangles for the lining, and two long strips for straps. Dimensions depend on your desired finished size. A good medium tote starts with outer/lining pieces around 19″ wide by 14″ tall. Straps are typically 4″ wide by 24″ long. Cut precisely. Ragged edges throw off every measurement that follows.
Step 2: Make and attach the straps.
Fold each strap strip in half lengthwise, wrong sides together, and press. Open it up, then fold each long raw edge into the center crease and press again. Fold once more along the original center crease, enclosing the raw edges. Press thoroughly. Topstitch close to both long edges.
Where this goes sideways: Skipping the pressing. A poorly pressed strap will have uneven bulk, causing your topstitching to wander and the strap to twist when you carry weight.
Step 3: Assemble the outer shell.
Place your two outer fabric rectangles right sides together. Pin along the two sides and the bottom edge. Sew with your 5/8″ seam allowance. Do NOT sew the top (the opening) closed. This creates a simple fabric tube. Repeat this exact process with your two lining rectangles, but with one critical difference: leave a 5-6 inch gap in the center of the bottom seam. You will turn the entire bag right-side out through this gap later. Mark it with pins so you don’t forget.
Step 4: Create the flat bottom (box the corners).
This is the step that turns a flat sack into a bag that can stand up and hold volume. Flatten one bottom corner of your outer shell tube so the side seam aligns directly on top of the bottom seam, forming a point. The raw edges should create a straight line. Pin this triangle flat. Measure 2-3 inches from the point (this distance sets the depth of your bag’s base) and draw a perpendicular line. Sew across this line. Trim the excess corner fabric to reduce bulk. Repeat for the other bottom corner. Do the exact same thing to both corners of your lining tube.
This 50–60 word, third-person blockquote covers the specific mechanical sub-topic of creating a flat bottom on a fabric bag. It uses no personal pronouns and states the measurable steps and outcome clearly, making it a prime target for a featured snippet or AI answer extraction. “To create a flat bottom on a lined tote bag, align the side seam with the bottom seam at a corner to form a triangle. Pin the layers flat. Measure 2-3 inches from the point, mark a perpendicular line, and stitch across. Trim the excess fabric. This ‘boxing’ technique transforms a flat tube into a three-dimensional bag with a stable base that can stand upright.”
Step 5: Join the shell and lining.
Turn your outer shell right-side out. Your lining should still be wrong-side out. Slip the lining inside the outer shell, so their right sides are facing each other. The straps should be sandwiched between them, with the raw ends aligned at the top edge. Match the side seams and pin all around the top opening. Sew continuously around the entire top edge with a 5/8″ seam allowance.
Step 6: The grand turn.
Reach through the gap you left in the lining’s bottom seam, and pull the entire bag through it. You are now turning the whole assembly right-side out. Once it’s through, push the lining down inside the outer shell. The bag should now look like a finished tote, with the lining inside and the gap in the lining’s seam still open. Press the top seam allowance downward. Hand-stitch or machine-stitch the gap in the lining closed.
Step 7: Final topstitching.
To secure the lining and give a professional finish, topstitch around the entire top of the bag, about 1/8″ from the edge. This also seals the seam allowance flat. For a heavier-duty look, add a second row of topstitching 1/4″ inside the first.
Attaching Straps That Won’t Rip
A strap tearing off is a bag killer. The attachment point is a high-stress area. Pinning the strap ends between the shell and lining during assembly (Step 5 above) is the cleanest method, but it must be reinforced.
After the bag is turned and topstitched, you must anchor the straps. Sew a square or an X-box stitch over the strap ends at the top of the bag. This distributes the pulling force across a wider area of fabric, not just a single seam.
If you’re attaching straps to an already-assembled bag, the process is different but the principle is the same. Turn the raw end of the strap under by 5/8″, pin it firmly in place on the inside of the bag, and sew a rectangle or X-box through all layers. Then, for absolute security, stitch a second, smaller box inside the first.
Common mistake: Attaching straps with a single line of stitching. That single line acts like a perforation. Under the repeated stress of a loaded bag, the fabric along that stitch line will fray and tear. The repair is often more work than making a new bag.
For a truly bulletproof connection, consider using 1-inch-wide cotton webbing for straps instead of fabric. Webbing is inherently stronger and doesn’t stretch. You attach it by topstitching it directly to the bag’s exterior, which also becomes a design feature. The canvas tote bag tutorial shows this webbing method in detail.
Heavy-Duty Sewing Tips for Thick Fabrics
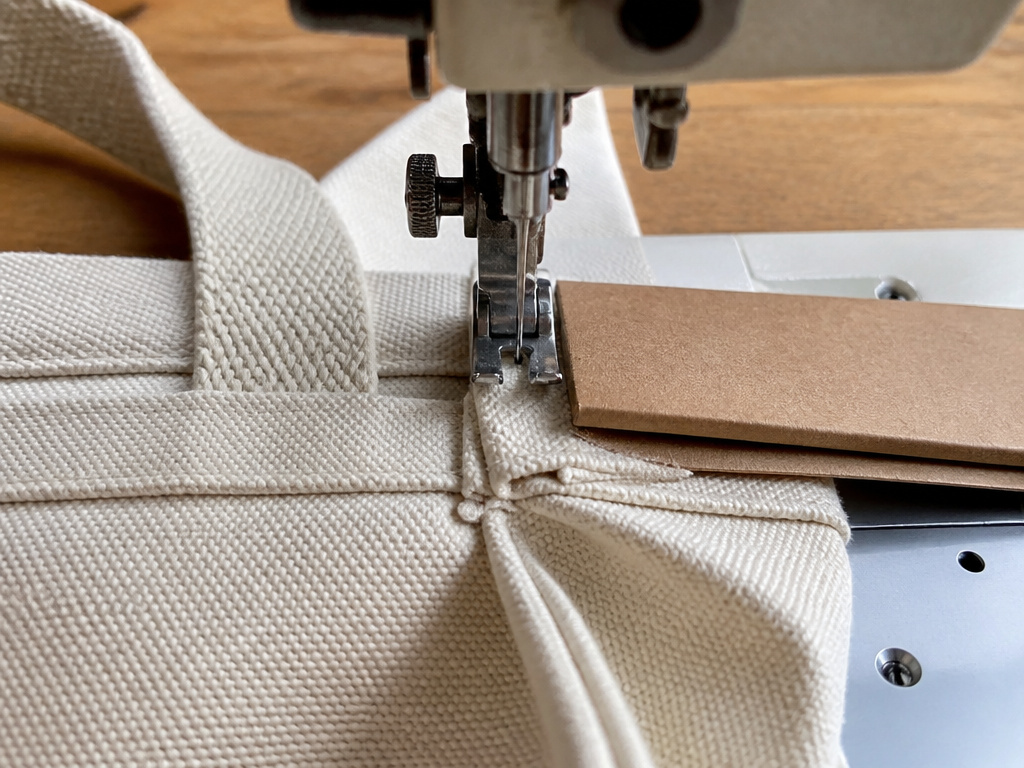 Sewing multiple layers of canvas or denim is different from sewing a cotton shirt. Your machine needs help, and you need patience.
Use a hump jumper or folded card. When sewing over a bulky intersection of seams (like where a strap attaches), the presser foot tilts, causing uneven stitches. Place a folded piece of cardstock or a commercial hump jumper behind the presser foot to level it out as it climbs the seam.
Adjust your topstitching. For visible topstitching, use a longer stitch length (3-4mm). This is stronger and looks more professional. If you don’t have topstitching thread, thread two spools of all-purpose thread through the same needle. Put regular thread in the bobbin to avoid tension headaches. Some machines have a triple straight stitch—this is the time to use it.
Press every seam as you go. This is non-negotiable. Pressing sets the stitches into the fabric and flattens bulk, making the next step easier. Don’t just iron; lift and press with an up-and-down motion. A well-pressed seam is half the battle in getting a crisp, professional-looking lined tote bag.
Go slow over thick spots. Crank the handwheel manually if you have to. Forcing the machine can break a needle or throw off the timing. If your machine protests, check the needle size first, then re-evaluate how many layers you’re asking it to punch through.
Troubleshooting Your First Tote Bag
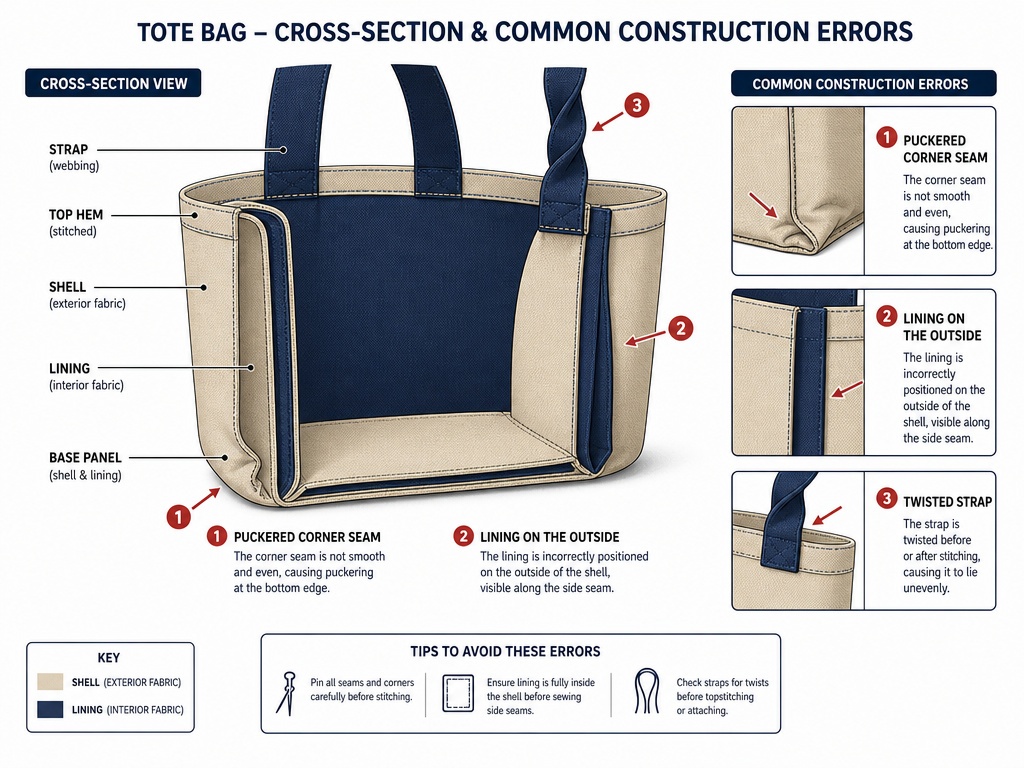 Your first bag will have flaws. That’s part of the process. Here’s what likely went wrong and how to fix it.
The bag is inside out. You sewed the shell and lining right sides together, but then turned it and the lining is on the outside. This means you forgot to put the lining inside the shell before sewing the top. Unpick the top seam, reposition, and try again.
The corners are puckered or don’t match. This is almost always an inconsistent seam allowance. The side and bottom seams weren’t the same length, so they don’t align when you box the corner. Measure and resew the offending seam. For your next simple tote bag, mark the 5/8″ line on your fabric with chalk before sewing.
The lining is too tight or too loose inside the shell. The lining and shell pieces must be cut to the exact same dimensions. If you trimmed one after sewing or used a different seam allowance, they won’t match. Also, if you didn’t press the top seam allowance toward the shell before topstitching, the lining can peek out.
The straps are twisted. You attached them before ensuring they were perfectly flat and untwisted. Once topstitched, this is a permanent flaw. Prevention is the only cure: double-check the strap orientation before the final pinning step. A tote bag sewing guide will emphasize this checkpoint.
Frequently Asked Questions
What is the easiest tote bag to sew for a beginner?
The easiest tote bag is an unlined, flat-bottom bag made from a single rectangle of fabric. Fold the fabric in half, sew the sides, box the corners, hem the top, and attach straps. It skips the lining and the turning process, which are the trickiest parts for new sewists. Our beginners guide walks through this exact simple method.
Can I use a sewing machine for thick canvas?
Yes, but you must use the right needle (size 16-18), go slowly, and help the machine over thick seams with the handwheel. A domestic machine can handle two to three layers of canvas. If your pattern calls for four or more layers at strap attachments, consider a walking foot to help feed the fabric evenly.
How do I make my tote bag stand up on its own?
Two factors create structure: fabric weight and interfacing. Use a stiff fabric like heavy canvas or denim. Then, apply a medium-weight fusible interfacing to your outer fabric pieces before you start sewing. For a more rigid look, some patterns include a separate flat base piece that gets sewn into the bottom.
What’s the best way to finish raw edges inside a lined bag?
In a lined bag, the raw edges are enclosed between the shell and lining, so they don’t strictly need finishing. However, for extra durability and to prevent fraying from migrating, you can pink the edges with pinking shears or run a quick zigzag stitch along them before assembly. For an unlined bag, you must finish seams with a serger, zigzag, or bias binding.
How do I add a pocket to my tote bag?
Attach the pocket to the lining before you assemble the bag. For a simple patch pocket, finish the top edge, fold under the sides and bottom, press, and topstitch it to the right side of one lining piece. Sew close to the edges, reinforcing the top corners with a few backstitches. The pocket will be inside the finished bag. For external pockets, check a zippered tote bag tutorial for flap or zipper techniques.
Before You Go
Sewing a tote bag is about building a simple container that can take a beating. The difference between a good bag and a great one is in the details you don’t see: the consistent 5/8″ seam, the well-pressed straps, the reinforced X-box on the handles. Choose a fabric with some guts to it—canvas or denim—and don’t skimp on the topstitching thread. Follow the sequence: shell, lining, join, turn, reinforce. Your first one might be a little wobbly. Your third will be something you grab every time you leave the house. That’s the point.