DIY Guide: How to Make a Sturdy Tote Bag with Fabric Lining
This post contains affiliate links. As an Amazon Associate, we earn from qualifying purchases.
To make a tote bag with lining, you need to construct two separate bags, an outer shell and an inner lining, then join them at the top opening. The critical step is leaving a 5-inch gap in the lining’s bottom seam, which you’ll use to pull the entire bag right side out after sewing. A lining conceals raw seams, adds durability, and lets you include internal pockets.
Most first-time bag makers forget that gap. They sew the lining shut perfectly, only to realize they’ve created a beautiful, permanently inside-out pouch. The other common trip-up is using flimsy fabric for the handles, which will stretch and fail after a few trips to the farmer’s market.
This guide walks through the entire process, from choosing the right fabric to the final topstitch. We’ll cover the two main lining methods, how to add structure with interfacing, and the simple trick for boxed corners that gives your bag a proper bottom.
Key Takeaways
- Always pre-wash your fabric. Cotton canvas shrinks about 3% on the first hot wash. If you skip this, your beautifully sewn bag will pucker and warp after its first laundry day.
- Cut the lining fabric 1/4-inch smaller than the outer fabric. This slight difference makes the lining sit snugly inside the shell without bubbling or wrinkling.
- Reinforce your handles. A single layer of canvas isn’t enough. Use a double layer, interface them, or switch to 1/2-inch cotton webbing. A bag with broken handles is just a bucket.
- The turning gap in the lining is non-negotiable. Mark it with a pin before you start sewing the lining’s bottom seam. If you sew it closed, your only option is the seam ripper.
- Press every seam as you go. An iron is not a suggestion; it’s the second most important tool on your bench. Pressed seams lie flat and make the final topstitching look professional.
Why a Lining Makes All the Difference
A lining transforms a simple sack into a finished bag. The inside looks clean, with no exposed seams or loose threads to snag your keys. It adds a layer of durability, the lining fabric absorbs daily abrasion, protecting the outer material. That’s why a well-made canvas tote bag guide always includes this step.
You also gain functionality. A lined bag is the perfect place to add a zippered pocket or a simple patch pocket for your phone. Without a lining, adding these features looks messy and weakens the outer fabric. The structure improves, too. A lining, especially when paired with a medium-weight interfacing, helps the bag hold its shape instead of collapsing into a rag when empty.
A lined tote bag conceals all interior construction seams, adds a protective layer against wear, and provides a stable foundation for internal pockets or closures. The lining fabric, typically a smooth cotton, is cut slightly smaller than the outer shell to ensure a smooth fit without excess material.
I learned the hard way that skipping interfacing on a linen tote was a mistake. The bag was gorgeous for about a week. Then it softened, the corners lost their shape, and it started to sag like a tired hammock. I now use Pellon SF101 featherweight fusible interfacing on nearly every natural-fiber outer fabric. It adds just enough body without making the fabric stiff.
Gathering Your Materials and Tools
You don’t need specialized gear. A basic sewing machine with a straight stitch is enough. A walking foot helps when sewing through multiple layers of canvas and interfacing, but it’s not mandatory. Your iron is critical. Don’t use a mini travel iron; you need steady heat and steam.
For a standard 15” x 16” tote bag with 22” handles, you’ll need about half a yard of 45-inch wide fabric for the outer shell and another half yard for the lining. If you want to follow a proven path, start with a beginner tote bag tutorial that uses these measurements.
Fabric Choices:
| Fabric Type | Best Use For | Considerations |
|---|---|---|
| Cotton Canvas | Outer shell | Durable, stiff, holds shape. Pre-wash to soften. |
| Quilting Cotton | Lining | Vast pattern choices, smooth against contents. |
| Cotton Duck | Outer shell (heavy duty) | Very stiff. Use a heavier needle (size 90/14). |
| Linen Blend | Outer shell (dressy) | Wrinkles easily. Requires interfacing for structure. |
| Polyester | Lining (wet items) | Water-resistant. Can be slippery to sew. |
Your thread should match the fabric weight. All-purpose polyester thread works for everything here. Avoid old cotton thread; it degrades and snaps over time. You’ll also need pins or clips, fabric scissors, a seam ripper (you’ll use it), and a measuring tape.
A note on upcycling: a heavy-duty feed bag tote tutorial is a fantastic way to get durable fabric for free. Just be sure to wash it thoroughly, twice.
The Two Methods for Attaching a Lining
You have two main paths: the inside-out method and the drop-in method. The inside-out method is cleaner and more secure for most home sewers. The drop-in method is faster and better for bags that are too structured to turn inside out easily.
The Inside-Out Method is what most tutorials use. You sew the outer bag and the lining bag separately, then place them right sides together and sew around the top. You then pull the entire bag through the gap left in the lining’s bottom. Finally, you hand-stitch the lining gap closed. This gives you a perfectly aligned, clean top edge that’s finished with a line of topstitching.
The Drop-In Method is different. You sew the lining completely shut, no gap. Then you insert the finished lining into the finished outer bag, wrong sides together. You fold under the raw edges at the top and pin them in place, then sew a line of topstitching around the top to secure both layers. It’s simpler, but getting a clean fold on the lining’s top edge requires precision. Any unevenness shows in the final topstitching.
I won’t recommend the drop-in method for a first lined bag. The inside-out method is more forgiving because the critical seam is hidden between the layers. With the drop-in method, your topstitching is the star of the show, and any wobble is permanently on display.
For a bag that needs to be rigid, like a boxed tote bag construction with a thick bottom panel, turning it inside out can be a wrestling match. That’s the one case where I opt for the drop-in method. Otherwise, stick with inside-out.
TL;DR: Use the inside-out method for a clean, hidden seam. Use the drop-in method only if your bag is too stiff to turn inside out.
Step-by-Step: The Inside-Out Lining Method
Follow this sequence. Rushing leads to the seam ripper.
Step 1: Cut and Prepare Your Fabric
Pre-wash and iron all fabric. This is non-negotiable. For a 15” x 16” finished bag, cut two rectangles from your outer fabric measuring 16” wide by 17” tall. Cut two rectangles from your lining fabric measuring 15.75” wide by 16.75” tall. That 1/4-inch reduction makes the lining fit neatly.
If you’re using interfacing, fuse it to the wrong side of your outer fabric pieces now. Follow the manufacturer’s instructions: steam and a hot iron for about 10 seconds per section.
Step 2: Sew the Outer Bag
Place the two outer fabric pieces right sides together. Pin along the two side edges. Using a 1/2-inch seam allowance, sew from the top edge down to the bottom edge on both sides. Do not sew the bottom closed. Backstitch at the start and end. Press the seams open with your iron.
Common mistake: Using a 1/4-inch seam allowance on a bag, the stress of carrying weight will pop these seams within a month. Always use a 1/2-inch seam allowance for tote bags.
Step 3: Sew the Lining (and Remember the Gap!)
Place the two lining pieces right sides together. Pin along the two side edges AND the bottom edge. This time, as you sew the bottom seam, you will stop sewing about 5 inches from the end, backstitch, and leave that gap open. Then start sewing again to finish the seam. Mark this gap with a pin before you start. Sew the side seams as you did for the outer bag. Press all seams open.
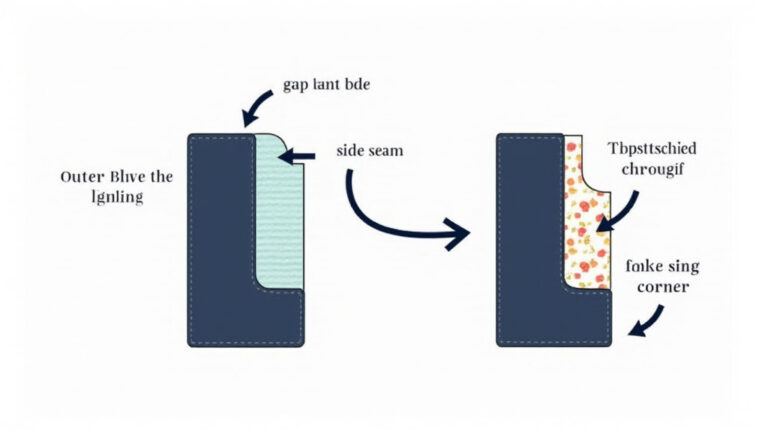
Step 4: Create Boxed Corners for Depth
This step gives your bag a flat bottom and volume. Lay the outer bag flat with its side seam running down the middle. Flatten the bottom corner so the side seam aligns with the bottom seam, forming a triangle. The point of the triangle is the corner of your bag. Measure 2 inches from that point along the seam and draw a line perpendicular to the seam. Pin it. Sew across that line. Trim the excess triangle of fabric to about 1/4 inch from your stitch line. Repeat for the other bottom corner of the outer bag. Do the exact same thing for both bottom corners of the lining.
Step 5: Attach Handles and Join the Bag to Lining
Turn the outer bag right side out. The lining stays wrong side out. Decide on handle placement, typically 3 inches in from each side seam. Pin your handles (double-layer fabric strips or webbing) to the right side of the outer bag, raw edges aligned at the top. Baste them in place with a long stitch.
Now, slide the outer bag inside the lining. They are right sides together. The handles are sandwiched between them. Align the top edges and the side seams. Pin all the way around. Sew around the entire top edge using your 1/2-inch seam allowance.
Step 6: Turn, Press, and Topstitch
Reach through the gap you left in the lining’s bottom seam. Grab the outer bag and pull the entire thing through until it’s right side out. Use a blunt tool like a knitting needle to gently push out the corners. Now the lining is inside the outer bag. Press the top edge flat, rolling the seam slightly towards the inside so it doesn’t show.
Edgestitch around the top, about 1/8 inch from the edge. This secures the layers and gives a professional finish. Finally, hand-stitch the gap in the lining closed using a ladder stitch.
TL;DR: Sew outer bag and lining separately, box the corners, join them at the top, pull through the lining’s gap, and topstitch.
Adding Pockets, Closures, and Custom Touches

Once you master the basic lined bag, customizing it is straightforward. An internal patch pocket is the easiest upgrade. Cut a rectangle of lining fabric (e.g., 8” x 7”). Fold and press a 1/2-inch hem around all four edges. Pin it to the right side of one lining piece before you sew the lining bag together in Step 3. Stitch around three sides, leaving the top open.
For a more advanced project like a zipper tote bag, you’ll install the zipper in the top seam before joining the bag and lining. It adds complexity but also security.
If you love the look of a quilted tote bag, you create the quilted outer panel first, treating it as your single piece of outer fabric. The lining process remains the same.
The beauty of a lined bag is that all this construction happens on the inside. Your mistakes are hidden, and your successes look intentional. For a truly versatile piece, study a reversible tote bag design, which uses the lining method but with two decorative outer fabrics.
Troubleshooting Common Sewing Problems

Your machine is skipping stitches. This almost always means a dull needle. You should change your needle after every 8-10 hours of sewing, or at the start of any new project with thick fabric. Use a denim or jeans needle (size 90/14 or 100/16) for canvas.
The fabric is puckering as you sew. First, re-thread both the top thread and the bobbin. Ninety percent of puckering is incorrect threading. Next, check your tension. For medium-weight fabrics, a tension setting of 4 is standard. Test on a scrap first.
Common mistake: Pulling fabric through the machine, this stretches the weave under the presser foot and guarantees uneven, puckered seams. Let the machine’s feed dogs pull the fabric. Your hands only guide.
Your boxed corners are lopsided. This happens when the side seam and bottom seam aren’t perfectly aligned when you flatten the corner. Pin the triangle carefully before sewing. If one corner is still off, don’t rip it out. Just make the other corner match it. Consistency is more important than perfection.
The lining is too tight or too loose after turning. If it’s tight and pulling the outer fabric, you didn’t cut it slightly smaller. If it’s loose and bubbling, you cut it the same size as the outer fabric. For the next bag, remember the 1/4-inch rule. For this bag, a loose lining can sometimes be fixed by steaming and pressing it aggressively to shrink the cotton slightly.
Frequently Asked Questions
What is the easiest fabric for a beginner to sew a lined tote bag with?
Start with a mid-weight quilting cotton for both the outer bag and the lining. It’s easy to cut, doesn’t fray excessively, and feeds through a sewing machine smoothly. Avoid slippery fabrics like satin or very stiff fabrics like heavy-duty canvas for your first attempt. A good simple sewing techniques guide will always recommend stable cottons.
Can I use a sewing machine to sew through thick canvas layers?
Yes, but you need the right setup. Use a fresh denim needle (size 90/14). Slow down your sewing speed. Consider using a walking foot attachment, which feeds the top and bottom layers evenly and prevents shifting. If your machine struggles, you can sew the handles on by hand using a strong backstitch.
How do I make my tote bag more sturdy?
Three things add major durability: using a robust fabric like cotton duck, applying fusible interfacing to the outer fabric, and double-stitching stress points. Sew a second line of stitching just inside your first seam on the side seams and the bottom of the bag. Also, reinforce the handle attachments with a box or X-shaped stitch pattern.
Is it necessary to pre-wash the fabric?
Absolutely. Natural fibers like cotton and linen shrink. If you construct your bag with unwashed fabric and then wash the finished product, the lining and outer fabric may shrink at different rates. This causes twisting, puckering, and misshapen handles. Always pre-wash and dry your fabric as you intend to care for the finished bag.
What’s the best way to repair a torn lining?
If the tear is small, use a simple hand-stitched patch. Cut a piece of similar lining fabric about an inch larger than the tear on all sides. Turn under the edges of the patch, pin it over the tear on the inside of the bag, and stitch it down with a slip stitch or whip stitch. For large rips, it’s often easier to make a new bag, consider it a chance to practice your sewing a tote bag skills again.
The Bottom Line
Making a lined tote bag is a satisfying project that teaches fundamental sewing skills. The process, cutting, sewing, turning, finishing, builds confidence. Remember the core sequence: two bags, one gap, turn, and close. Your first bag might have a wobbly topstitch or a slightly crooked handle. That’s fine. The second one will be straighter.
Invest time in fabric selection and prep. A bag made from pre-washed canvas and a sturdy lining will last for years, far longer than any flimsy store-bought version. Once you’ve mastered this, you have the blueprint for countless variations, from a flat-bottom tote bag to a crochet tote bag. The lined tote is a classic for a reason. It works.