How to Decorate a Tote Bag With Lasting Paint & Embroidery
This post contains affiliate links. As an Amazon Associate, we earn from qualifying purchases.
To decorate a tote bag for a design that lasts, match three things: your decoration method to your bag’s fabric, apply the correct heat and pressure, and follow the post-decoration care rules. On 100% cotton canvas, heat transfer vinyl survives 30-50 washes, a heat-set fabric paint design lasts 50+ washes, and embroidery can go 100+ cycles before thread wear shows.
That match decides whether your art outlasts the bag or flakes off in a month. A cotton tote needs over 100 uses to justify its environmental footprint versus plastic—a number most plain bags never see. A bag you took the time to personalize is a bag you’ll actually reuse.
What follows is a breakdown of the four most durable methods, built on manufacturer specs and wash-test timelines. You’ll get the exact temperatures, the one chemical additive that stops paint from cracking, and the fabric choices that guarantee failure before you start.
Key Takeaways
- Fabric is non-negotiable. 100% cotton canvas (10-12 oz/yd²) works for almost everything. Polyester, nylon, or recycled plastic (rPET) bags will cause paint to bead and vinyl adhesive to fail prematurely—they’re only suited for sublimation transfers.
- Heat-setting is mandatory, not optional. For paint, HTV, and dye, the correct application of heat chemically bonds the color or adhesive to the fabric fibers. Skipping it means your design washes out within 3-5 cycles.
- Acrylic paint alone always cracks. Mix standard acrylic paint with a fabric medium like Liquitex Fabric Medium at a 2:1 ratio. This modifies the paint’s plastic film to remain flexible on fabric, preventing the inevitable cracks that appear after a few bends of the bag.
- Storage matters as much as application. Repeatedly folding a painted or vinyl design on the same crease line creates a stress point that will crack over time. Store decorated bags flat or hung to maximize their lifespan.
- Wash with method-specific care. Embroidered bags are hand-wash only. Newly tie-dyed bags must be washed alone for the first 3-5 cycles to prevent dye bleed. For most other methods, wash inside-out on cold and air dry.
The 3 Things That Decide Durability
Your bag’s material is the first and largest gate. Get it wrong, and no technique will save you.
The bond between decoration and fabric is a chemical or mechanical lock. Heat-transfer vinyl uses a heat-activated polyurethane adhesive. Fabric paint polymerizes with heat. Embroidery is thread physically punched through the weave. The strength of that lock determines how many wash cycles the design survives.
100% cotton canvas is the universal donor. Its porous, textured surface gives paint something to grip and allows HTV adhesive to flow into the fibers. The ideal weight is 10–12 oz/yd² (340–410 g/m²). This is heavy enough to resist bleed-through and support embroidery without puckering, but not so stiff it’s unpleasant to carry.
Polyester, nylon, and recycled PET (rPET) bags are decoration minefields. Their slick, synthetic fibers repel water-based paint, causing beading. The adhesives in heat transfer vinyl struggle to form a permanent bond on these surfaces, leading to premature peeling. If your bag is made from these materials, your only reliable option is sublimation printing, which uses high heat to dye the polyester fibers themselves.
The second factor is preparation. New canvas has a starch-like sizing applied during manufacturing that resists moisture—and paint. Always pre-wash and iron your bag. This removes the sizing and any wrinkles, creating a clean, receptive surface. Inserting a piece of cardboard or foam board before you decorate is the step everyone skips and regrets. It prevents paint from bleeding through to the back and provides a firm, stable work surface.
Third is post-decoration care. How you wash and store the bag has a direct impact on its longevity.
| Decoration Method | Wash Recommendation | Key Care Rule | Failure Mode if Ignored |
|---|---|---|---|
| Heat Transfer Vinyl (HTV) | Machine wash, cold, gentle. Tumble dry low or air dry. | Avoid high-heat drying. | High dryer heat reactivates adhesive, causing it to ooze and attract lint, then re-harden into a brittle mess. |
| Fabric Paint / Acrylic | Machine wash, cold, inside-out. Air dry. | Wait 24-48 hours after heat-setting before first wash. | Washing too soon interrupts the polymer cure; pigment washes out in streaks. |
| Embroidery | Hand wash only in cold water with mild soap. Lay flat to dry. | Never wring or twist the bag. | Aggressive washing distorts the canvas and can snap delicate embroidery threads, ruining the design tension. |
| Tie-Dye | Wash alone in cold water for first 3-5 cycles. Use a color-catching sheet. | Never wash with light colors initially. | Unfixed dye bleeds onto other laundry, staining everything in the load. |
Heat Transfer Vinyl (HTV): The No-Sew Workhorse
For a crisp, professional-looking graphic that applies in minutes, HTV is the default. Brands like Siser EasyWeed are popular for a reason: their specs are reliable and tested.
The process seems simple—cut, weed, press. The durability lives in the press. The adhesive needs a specific temperature and time to fully melt and flow into the fabric weave, creating a mechanical grip as it re-solidifies.
For cotton canvas, the sweet spot is 305–320°F (150–160°C) for 10–15 seconds with medium pressure. A common mistake is pressing too hot or too long, which can scorch the canvas. Too little heat or time leaves the adhesive only partially activated. It might feel stuck initially, but the first wash will lift the edges.
Where this goes sideways: Pressing on a cold, wrinkled bag. Moisture and wrinkles create micro-gaps between the vinyl and fabric. The adhesive bridges air instead of bonding to fiber, guaranteeing a peel point.
Always “pre-press” your empty bag for 3-5 seconds to drive out moisture and flatten the canvas. When you apply the HTV, use a cover sheet (like Teflon or parchment paper) to protect the vinyl’s top layer. Press firmly, then let it cool completely before peeling the carrier sheet. This “cold peel” gives the adhesive time to set.
A properly applied HTV design on cotton canvas can withstand 30–50 machine washes before the edges may begin to lift. That’s years of weekly use.
Fabric Paint & Acrylic: The Creative Canvas
 This is where most DIY projects start and fail. The failure is almost always chemical, not artistic.
Standard acrylic paint is designed for rigid surfaces like wood or canvas stretchers. It dries into a plastic film. Fabric bends, folds, and flexes. That plastic film cannot flex with it, so it cracks. You’ll see the first hairline fractures along the fold lines after just a few uses.
The fix is a fabric medium. This is a clear liquid additive that modifies the acrylic paint’s chemistry. Mix it at a 2:1 ratio of paint to medium (like Liquitex Fabric Medium). The medium breaks up the paint’s plastic polymers, allowing them to bond with the fabric fibers and remain flexible after drying. It turns cheap craft acrylic into a serviceable fabric paint.
Dedicated fabric paints, like Tulip Soft or Jacquard Neopaque, have this flexibility built in. They also often have better opacity on dark fabrics.
The second non-negotiable step is heat-setting. This isn’t just drying the paint; it’s using heat to catalyze a chemical bond.
- Let the painted design air dry completely, for at least 24 hours.
- Place a thin cloth (like a pillowcase) over the design.
- Iron on the cotton setting (no steam) for 30-45 seconds, moving the iron slowly to cover every part of the design.
- Wait another 24 hours before using or washing the bag.
This heat-setting process is what makes the design washable. Without it, the paint remains water-soluble and will wash out in 3-5 cycles. With it, a design on quality canvas can survive 50+ gentle washes.
Embroidery: The 100-Wash Gold Standard
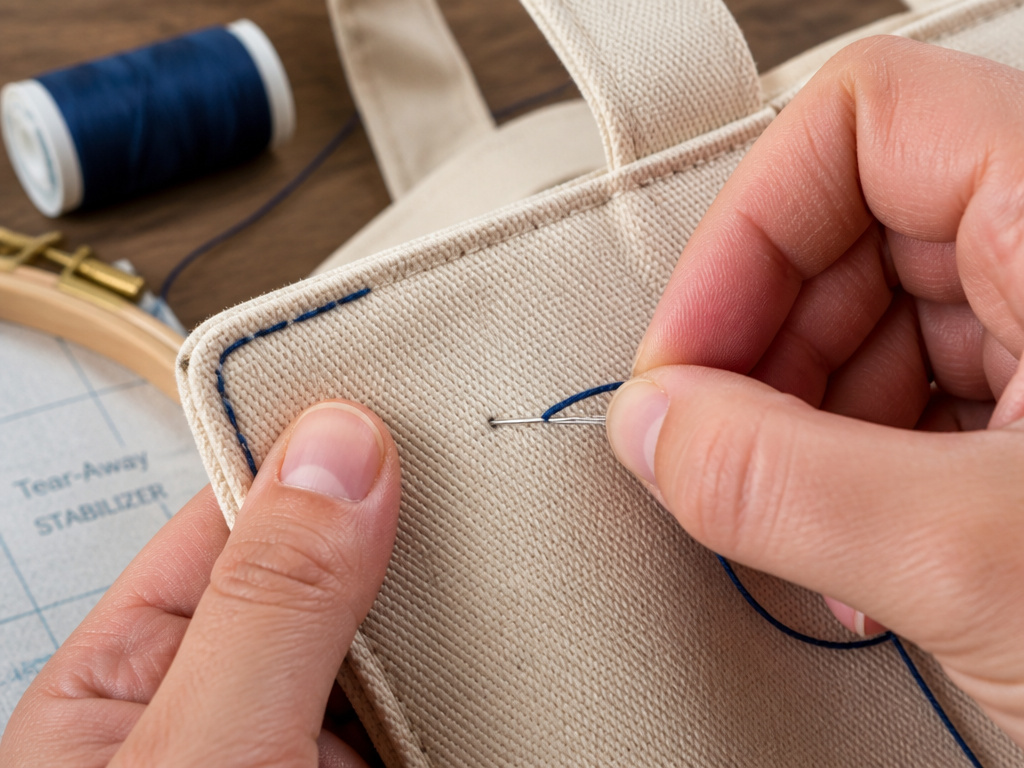 Embroidery doesn’t adhere—it becomes part of the fabric. Each stitch is a thread physically locked through the canvas weave. This makes it the most permanent decoration method. The only failure mode is thread abrasion, which takes 100+ wash cycles to become noticeable.
I prefer hand embroidery for small, textured accents on a bag corner. The control is better, and you don’t fight with a hoop on a bulky, assembled bag. A simple backstitch outline takes about 90 minutes and looks fantastic.
For machine embroidery, stabilization is critical. Canvas is a loose weave that will pucker under the tension of hundreds of stitches. You need a sturdy, tear-away stabilizer hooped behind the fabric. The needle matters, too. Use a size 75/11 sharp needle for the best penetration on 10 oz canvas.
The care rules are strict but simple: hand wash only. Soak in cold water with a mild detergent for 10 minutes, gently squeeze (no wringing), roll in a towel to remove excess water, and lay flat to dry. Machine washing, even on gentle, will batter the threads and distort the fabric over time.
Tie-Dye & Fabric Dye: The Bold Background
 Dye works by chemically bonding with the fabric fibers themselves. It’s not a surface layer. For this to work, you need a natural fiber like 100% cotton. Synthetic fibers like polyester won’t bond with most consumer dyes.
The Tulip Tie Dye Kit is a reliable starting point. It contains fiber-reactive dyes that bond at room temperature. The process is about patience, not pressure.
- Pre-wash the bag. Dye adheres better to damp, clean fabric.
- Mix the dye according to the kit instructions.
- Twist, fold, or bind the bag with rubber bands to create your pattern.
- Apply the dye thoroughly, ensuring it saturates the bound sections.
- This is the critical step: place the dyed bag in a sealed plastic bag and let it sit for 6-8 hours, or even overnight. This “batch time” allows the chemical reaction to complete.
- Rinse under cold water until the water runs clear, then wash alone in cold water.
Skip this if: You’re in a hurry. Cutting the batch time short means the dye molecules haven’t fully bonded. The color will bleed excessively and fade quickly.
Newly dyed bags must be washed alone in cold water for the first 3-5 cycles. Use a color-catching sheet in the wash to trap any loose dye molecules. After that, the color is stable.
The Method vs. Material Match-Up
With the core methods defined, your choice comes down to your bag’s material and your desired outcome. This isn’t a vague “depends on your needs” answer. Each method has a clear winner per scenario.
| Your Bag Material | Best Method | Runner-Up | Method to Avoid |
|---|---|---|---|
| 100% Cotton Canvas | Embroidery or HTV. Max durability and clean finish. | Fabric Paint. Total creative freedom. | Sublimation. Won’t work on natural fibers. |
| Polyester or rPET | Sublimation. The only method that dyes the fiber. | HTV (with caution). Adhesion is less reliable. | Fabric Paint or Dye. Will bead, crack, or wash out. |
| Blended Fabric | HTV. Test adhesion first on an inside seam. | Screen-print transfer. Professional, durable finish. | Tie-Dye. Results will be uneven and muted. |
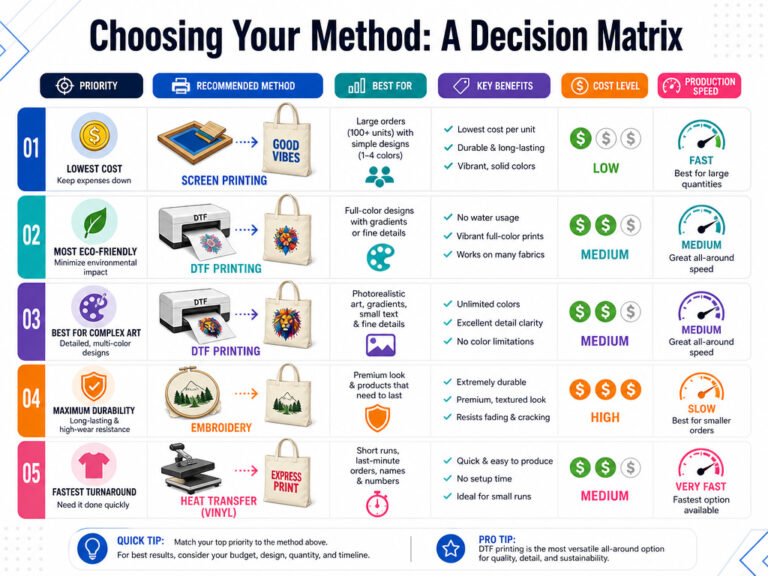
For a bold, all-over color, tie-dye wins. For a precise logo or text, HTV wins. For heirloom-quality texture and detail, embroidery wins. For freehand art, fabric paint wins.
If you want one answer for a standard canvas tote bag you’ll use for groceries or the library: start with heat transfer vinyl. The learning curve is low, the equipment (an iron) is common, and the durability-to-effort ratio is the highest. A Siser EasyWeed design applied correctly will outlive the bag’s seams.
Frequently Asked Questions
What is the easiest way to decorate a tote bag for a beginner?
Using a fabric marker or paint pen like a Posca is the easiest. There’s no mixing, no heat during application, and minimal setup. Draw directly on a pre-washed bag, let it dry, and heat-set with an iron. It’s forgiving and perfect for simple line art or lettering.
Can I use a regular iron for heat transfer vinyl?
Yes, a standard household iron works for HTV. The key is ensuring you can apply firm, even pressure and maintain a consistent temperature. Do not use steam. Press for the full recommended time (usually 30-45 seconds for cotton), applying as much pressure as you can. A heat press is better because it guarantees even pressure and temperature, but an iron is a fine starting point.
How do I stop paint from bleeding through the tote bag?
Always insert a barrier inside the bag before you start painting. A piece of cardboard, foam board, or even a plastic folder creates a firm surface and stops wet paint from soaking through to the back layer of canvas. This is the single most effective step for a clean finish.
How long should I wait before washing a newly decorated tote bag?
Wait at least 24-48 hours after the final heat-setting step. This curing time allows the paints, dyes, or adhesives to fully polymerize and bond with the fabric fibers. Washing too soon interrupts this process and will cause fading, peeling, or bleeding.
My tote bag is made from recycled plastic bottles. Can I decorate it?
You can, but your options are severely limited. RPET (recycled polyethylene terephthalate) is a type of polyester. As with regular polyester, sublimation printing is the only truly durable method. Fabric paint will not adhere properly and will crack. HTV may stick initially but is prone to peeling after a few washes or flexes of the material.
The Bottom Line
Decorating a tote bag isn’t just a craft. It’s a series of chemical and mechanical bonds. The right method on the right fabric, followed by the correct application of heat and care, turns a disposable item into a personal staple.
Focus on 100% cotton canvas. Respect the heat-setting step. Wash according to the method’s rules. Your design will survive dozens of trips, and more importantly, you’ll have a bag you actually want to use again and again. That’s what makes the time worthwhile.