How to Pack a Bag | The OEM Manuals Most Travelers Miss
This post contains affiliate links. As an Amazon Associate, we earn from qualifying purchases.
To pack a bag correctly, follow a three-part sequence: load the weight close to your back, use internal and external compression straps to stabilize it, and then adjust the harness so the hipbelt padding sits half above and half below your hipbone. This transfers the load to your hips and keeps the pack from shifting. The sequence is non-negotiable for comfort.
Most people start with the straps. That’s backward. The pack’s suspension can only do its job if the load inside is dense and secure first. Loosen everything, pack the weight against the backpanel, cinch it down, and then put it on. The difference is a pack that carries you versus one you have to carry.
What follows is the breakdown most bag manuals bury in the diagrams: where the hipbelt actually lands, how compression straps change a bag’s behavior, and the one storage rule that prevents permanent foam damage in your shoulder straps.
Key Takeaways
- Pack weight first, adjust fit second. Load 10-20 lbs of gear, secure it with internal compression straps, then put the pack on and adjust the harness. Reversing this order guarantees a sloppy, uncomfortable carry.
- The hipbelt anchors everything. According to the Osprey Aether 65L manual, the hipbelt padding must sit halfway above and below your hipbone. If it rides on your stomach or your lower back, the torso length is wrong.
- Internal compression straps are for stability, not just squeezing. Unbuckle and hang them outside the bag while packing. Once loaded, buckle and cinch them evenly so the buckle stays centered, this prevents gear from shifting side-to-side.
- Never store a loaded or compressed pack. The Arc’teryx Bora AR manual states compression during storage causes the foam in shoulder straps and hipbelts to lose its shape permanently.
- For checked luggage, remove the hipbelt. This prevents conveyor belts from snagging and tearing the straps. Use a duffel bag or a heavy-duty plastic bag as a protective liner.
The 3-Part Packing Sequence (Weight, Compression, Fit)
The right order turns a bag of gear into a balanced load. Get it wrong, and you’ll fight your pack all day.
Step one: load the weight against your back. This isn’t about stuffing things in. It’s about placement. Heavy items, a tool roll, a laptop, a dense water bladder, go in the main compartment, vertically oriented, as close to the backpanel as possible. Lighter, bulkier items like clothing go in front of that. The goal is a center of gravity that pulls inward toward your spine, not outward away from it.
Step two: engage the compression system. This is where people use the wrong straps. External straps are for overall profile reduction. The real magic is inside.
For the Osprey Ozone and Sojourn series, the manual is explicit: “Unbuckle and loosen the [internal compression] straps all the way, and have them hang out of the way along the sides of the pack. Once packed, buckle the straps and evenly cinch them.” The buckle should remain in the middle.
Cinching these internal straps does two things. It eliminates dead space that lets gear slide around, and it binds the load into a single, solid mass. A shifting load is an unstable load, it constantly tugs the harness off your shoulders.
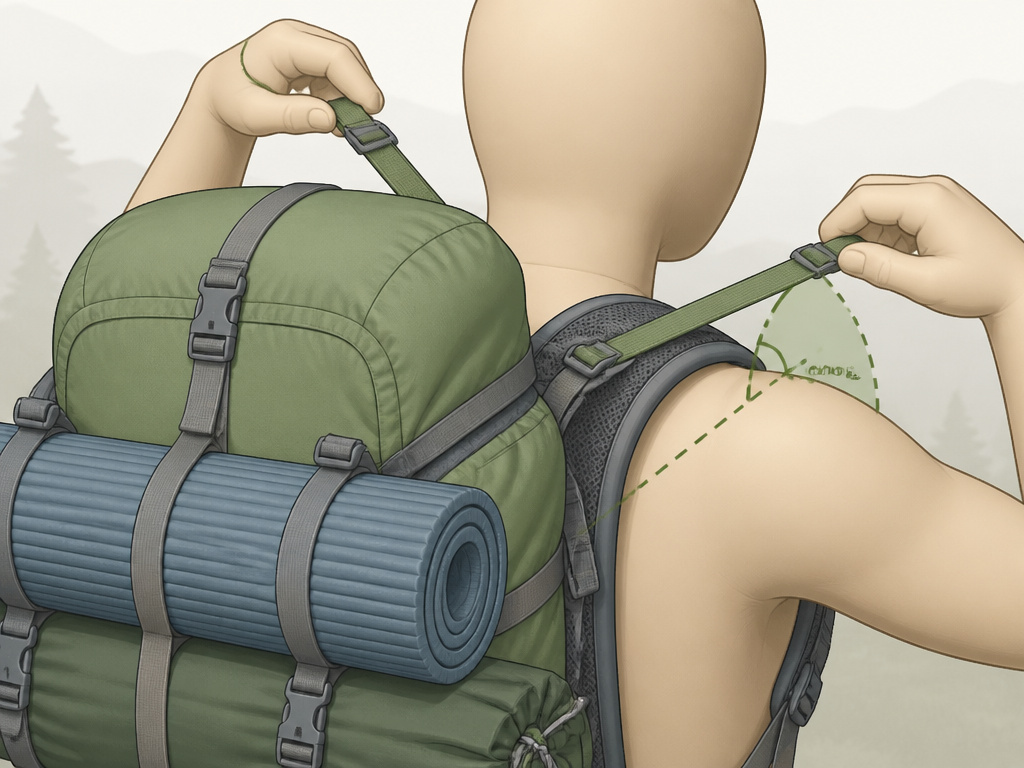
Step three: fit the harness to your body. Only now do you put the pack on. Loosen all straps first, hipbelt, shoulder straps, load lifters. Buckle the hipbelt and tighten it so the padding wraps your hips. Then pull down and back on the shoulder straps. Finally, tighten the load lifter straps at a 30 to 60-degree angle to pull the top of the pack close to your shoulders.
How to Adjust Your Bag’s Suspension (It’s Not Intuitive)
A bag’s harness isn’t a one-size-fits-all jacket. It’s a structural system with specific adjustment points. Missing one throws the others off.
Find your hipbone. This is the literal foundation. The iliac crest is the bony top of your pelvis you can feel with your hands. The Osprey Aether 65L manual directs: “The hipbelt padding should sit halfway above/below the hipbone.” If the belt is on your stomach, the torso is too short. If it’s on your lower back, the torso is too long.
Locate the C7 vertebra. Tilt your head down. The most prominent bone sticking out at the base of your neck is the C7. The yoke of the harness, where the shoulder straps meet near your neck, should sit 1 to 2 inches below this bone. This is the single best check for torso length.
Set the load lifters. These are the thin straps connecting the top of the pack to the harness. When properly adjusted, they form a 30 to 60-degree angle from your shoulder. Tightening them pulls the weight in and up, offloading your shoulders onto the hipbelt. If they’re horizontal or vertical, the harness height is wrong.
The sternum strap is a stabilizer, not a load-bearer. Clip it about 2 inches below your collarbone. Its job is to stop the shoulder straps from sliding off, not to take weight. If you’re cranking it tight to relieve shoulder pressure, the hipbelt isn’t tight enough.
| Adjustment Point | Correct Position | What Goes Wrong If It’s Off |
|---|---|---|
| Hipbelt | Padding centered on hipbone (half above, half below) | Weight stays on shoulders; lower back pain or stomach pressure. |
| Harness Yoke | 1–2 inches below C7 vertebra | Shoulder straps gap at the top or dig into armpits. |
| Load Lifters | 30–60 degree angle from shoulder | Pack pulls away from back; shoulders carry all the weight. |
| Sternum Strap | ~2 inches below collarbone | Shoulder straps slip off; no meaningful load improvement. |
Where this goes sideways: Setting the harness with an empty or loosely packed bag. The straps will feel fine until you add real weight, then the whole fit collapses. Always fit your pack with 10-20 pounds inside, as the Arc’teryx Bora AR manual instructs.
The Tools You Already Have: Straps, Pockets, and Compartments

Your bag’s features are tools, not decorations. Using them intentionally is what separates a tidy pack from a chaotic one.
Internal compression straps are your best friend. On Osprey travel packs like the Sojourn 80L, these straps run vertically inside the main compartment. Use them to section off gear or to tightly bundle a soft item like a sleeping bag. They prevent the “black hole” effect where everything sinks to the bottom.
The “liquids pocket” at the top isn’t just for toiletries. Its bellows design compresses. Use it for anything you need quick, one-handed access to: a headlamp, snacks, a multitool. On the Ozone series, it’s sized to fit a 1L wash bag or even Osprey’s own Airporter travel duffel.
Zippered panel access beats top-loading every time. A full-front panel zip, like on the Farpoint series, lets you see and reach everything without unpacking layers. This is critical for a packing a duffel bag or a hybrid travel bag where organization matters more than ultimate weight savings.
Mesh pockets are for wet or high-use items. A damp rain jacket, a water bottle, a pair of gloves. The stretch mesh on the sides of packs like the Aether 65L is designed to dry quickly and keep soggy gear away from everything else.
Lockable zippers are a travel essential. The main compartment zippers on the Ozone and Sojourn series have eyelets for TSA-approved locks. Use them. It’s a simple deterrent that protects your gear in crowded airports or hostel dorm rooms.
Packing a Wheeled Travel Bag vs. A Backpacking Pack
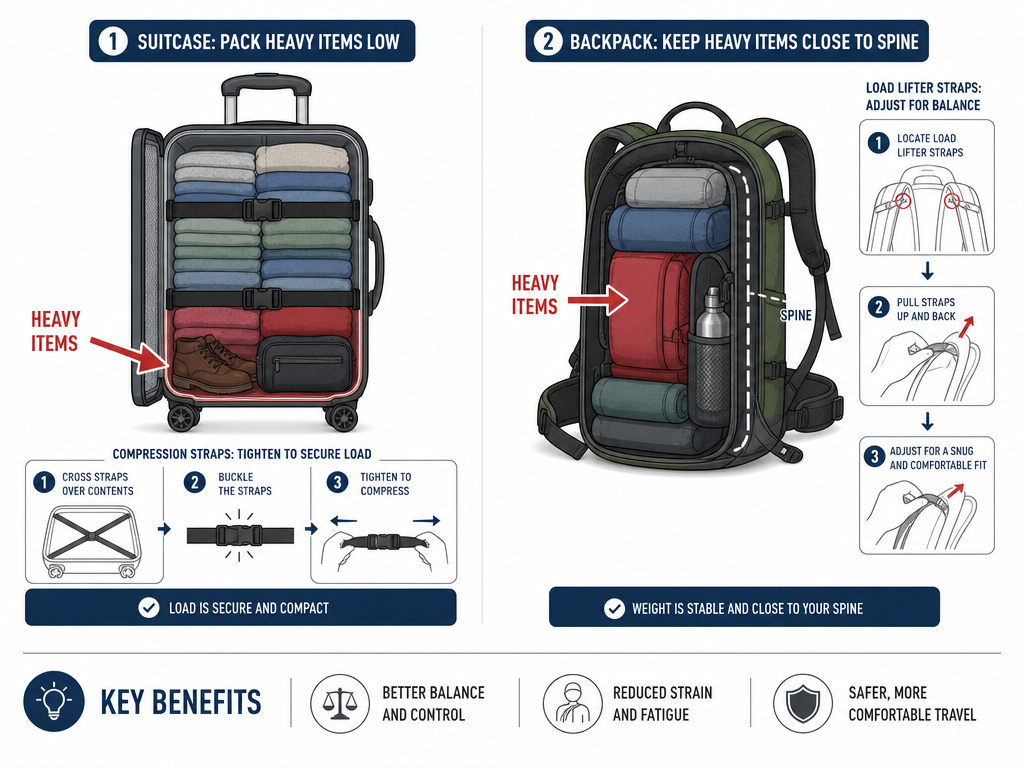
The core principles are the same, but the execution shifts. A wheeled bag has a rigid frame; a backpacking pack is built to flex with your body.
Wheeled bags (Osprey Ozone, Sojourn) demand balance. The HighRoad™ Chassis is a fixed structure. Pack the heaviest items directly over the wheels, this is usually the bottom third of the main compartment. If the weight is too high, the bag will tip backward when you extend the handle. Use the internal compression straps aggressively to keep gear from settling during transit.
Backpacking packs (Osprey Aether, Arc’teryx Bora AR) require dynamic loading. Weight must be centralized and close to the back. The sleeping bag compartment at the bottom is for your lightest, bulkiest item (your sleep system), not your tent. The main compartment holds your dense core: food, cookware, water reservoir. External straps like the StraightJacket™ compression on the Aether are for securing a partially empty pack or lashing on a jacket, not for carrying primary weight.
| Aspect | Wheeled Travel Bag (Osprey Sojourn) | Backpacking Pack (Osprey Aether) |
|---|---|---|
| Weight Priority | Low and centered over wheels. | High and close to the spine. |
| Key Strap | Internal compression straps. | Load lifter straps & hipbelt. |
| Packing Access | Full front panel U-zip. | Top lid & front panel zip. |
| External Use | Daisy chains for briefcase straps. | Ice axe loops & sleeping pad straps. |
| Carry Mode | Handle & wheels primary; backpack straps secondary. | Harness & hipbelt only. |
The daypack attachment changes the math. If you’re using a detachable daypack like the one included with the Farpoint 70L, pack it with in-flight essentials. Attach it to the front of your main pack while transiting. This keeps your laptop and documents accessible without rummaging through your primary bag, a useful trick whether you’re figuring out if you can bring a backpack on a plane as a personal item or managing a full travel setup.
Long-Term Storage and Air Travel Prep
How you put your bag away matters as much as how you pack it. Poor storage can ruin a perfect fit.
Never store the pack compressed or under heavy weight. This may cause the foam in the shoulder straps or hipbelts to lose their shape. – Arc’teryx Bora AR Manual
Store your bag empty, loosely filled with crumpled paper or a towel to maintain its shape, in a cool, dry place. A damp basement or a hot attic will break down fabrics and adhesives.
For air travel, protection is non-negotiable. Checking a backpack is a gamble. Conveyor belts are designed for hard-shell suitcases, not loose straps.
- Remove the hipbelt. The Arc’teryx manual insists on this for flights. It’s usually a matter of unclipping two buckles. This eliminates the biggest snag hazard.
- Use a liner. A large, durable plastic bag (like a contractor bag) or a dedicated packing a suitcase works. Put the entire pack inside and tie it closed. Some travelers use a cheap duffel bag as a sacrificial outer layer.
- Retract and secure all straps. Tighten every loose strap and tuck the ends into their keepers. If your pack has a stowaway harness (like the Farpoint), zip it away.
This is especially critical if you’re navigating specific airline rules, like the Delta backpack policy or the notoriously strict Spirit backpack policy. A protected pack is less likely to get damaged and flagged for gate-check issues.
Frequently Asked Questions
What is the most common mistake when packing a backpack?
Packing in the wrong order. People put the bag on and adjust the straps before securing the load inside. The internal gear must be stable before the harness can work. Always pack, compress, then fit.
How tight should my backpack hipbelt be?
Tight enough that the padding wraps your hips without gaping, with about 1-3 inches of webbing between the buckle and the belt when fully tightened. You should be able to slide a flat hand between the belt and your body, but not a fist. The weight should transfer to your hips within ten steps.
Can I wash my backpack in a washing machine?
Do not use a washing machine. Osprey and Arc’teryx manuals recommend hand-washing with cold water only, no soap or detergent. Rinse thoroughly to remove dirt and sweat, and let it air dry completely in the shade. A machine’s agitator can delaminate fabrics and break internal frames.
How do I know if my backpack is the right size?
The two measurable checks are hipbelt position (on the hipbone) and harness yoke position (1-2 inches below the C7 vertebra). If you cannot achieve both simultaneously, the pack’s torso size is wrong for you. Brands like Osprey offer multiple torso sizes on models like the Xenith and Xena series.
What’s the best way to pack efficiently for a week-long trip?
Use a core wardrobe of mix-and-match items and rely on compression packing cubes. Roll soft items like t-shirts and socks, and fold structured items like button-downs. Place cubes vertically in the main compartment, as if filing books on a shelf, so you can see and remove each one without unpacking everything else.
Before You Go
Packing a bag is a mechanical process. Weight goes close to your back. Compression straps lock it down. The hipbelt carries that load on your hips, not your shoulders. Every other tip, rolling clothes, using cubes, organizing pockets, serves that sequence.
Check your bag’s actual manual. The Osprey and Arc’teryx PDFs have diagrams and specs most blog posts guess at. Your hipbone and your C7 vertebra don’t lie. Fit the pack to them, not to how you think it should feel.
Then store it empty, and never check it without a shield. A bag is a tool. Pack it like one.