Can You Put a Backpack in the Dryer? Avoid Heat & Tumbling Damage
This post contains affiliate links. As an Amazon Associate, we earn from qualifying purchases.
Putting a backpack in a clothes dryer is a hard no. The heat deforms plastic hardware, delaminates waterproof coatings, shrinks technical fabrics, and voids manufacturer warranties. The only safe drying method is air-drying in a shaded, well-ventilated area with all compartments unzipped.
That rule holds for nearly every backpack material, nylon, polyester, canvas, and especially high-tech laminates like Dyneema. The damage isn’t always immediate. A seemingly fine pack after one dryer cycle often has a compromised waterproof layer or stressed seams that fail on the next hike.
What follows is the breakdown of why heat destroys backpacks, the specific drying technique that prevents mold, and how to spot the damage if you’ve already run the cycle.
Key Takeaways
- The dryer’s heat (often exceeding 70°C/158°F) melts polyurethane (PU) coatings, delaminates waterproof layers, and shrinks fabrics.
- Tumbling abrades fabrics and hardware against the drum, accelerating wear.
- Machine drying voids the warranty for major brands like Deuter, EVOC, and Eagle Creek.
- Air-dry by hanging the pack upside down in a shaded, breezy spot; never in direct sun or near a heater.
- For musty smells, use an enzyme-based cleaner, not dryer sheets or heat.
The One Rule Every Backpack Maker Agrees On
Check the care label inside any backpack from a reputable outdoor brand. You will find the same instruction: “Do not tumble dry” or “Air dry only.” This isn’t a suggestion. It’s a non-negotiable condition to maintain the pack’s functionality and your warranty.
Never machine-wash or machine-dry your backpack. The abrasion in the drum stresses the material and its polyurethane (PU) coating, causing long-term damage. Detergent residue left behind can irritate skin and, when combined with sweat and UV rays, accelerates material breakdown. – Paraphrased from Deuter’s official care guide.
Deuter’s stance is the industry standard. Eagle Creek’s warranty explicitly voids coverage for dryer damage. Thule warns that “intense heat can damage fabric as well as zipper pulls, straps, etc.” The consensus isn’t about being cautious; it’s about preserving engineered materials that have specific heat tolerances.
Why Your Backpack Isn’t a Towel
A cotton towel can handle high heat because it’s a simple, woven natural fiber. Your backpack is a composite system: * Fabrics: Nylon and polyester are plastics (polyamide and polyethylene terephthalate). They soften and shrink with heat. * Coatings: A thin polyurethane (PU) or thermoplastic polyurethane (TPU) layer provides water resistance. This coating melts. * Laminates: High-end waterproof fabrics like Dyneema Composite Fabric (DCF) are layered plastics bonded with adhesive. Heat delaminates them. * Hardware: Plastic buckles and zipper teeth can warp, while metal components get scorching hot and transfer that heat to the fabric.
Put this system in a dryer, and you’re applying destructive force from multiple angles: thermal stress, mechanical abrasion, and impact.
What Actually Breaks in the Dryer (And How Fast)
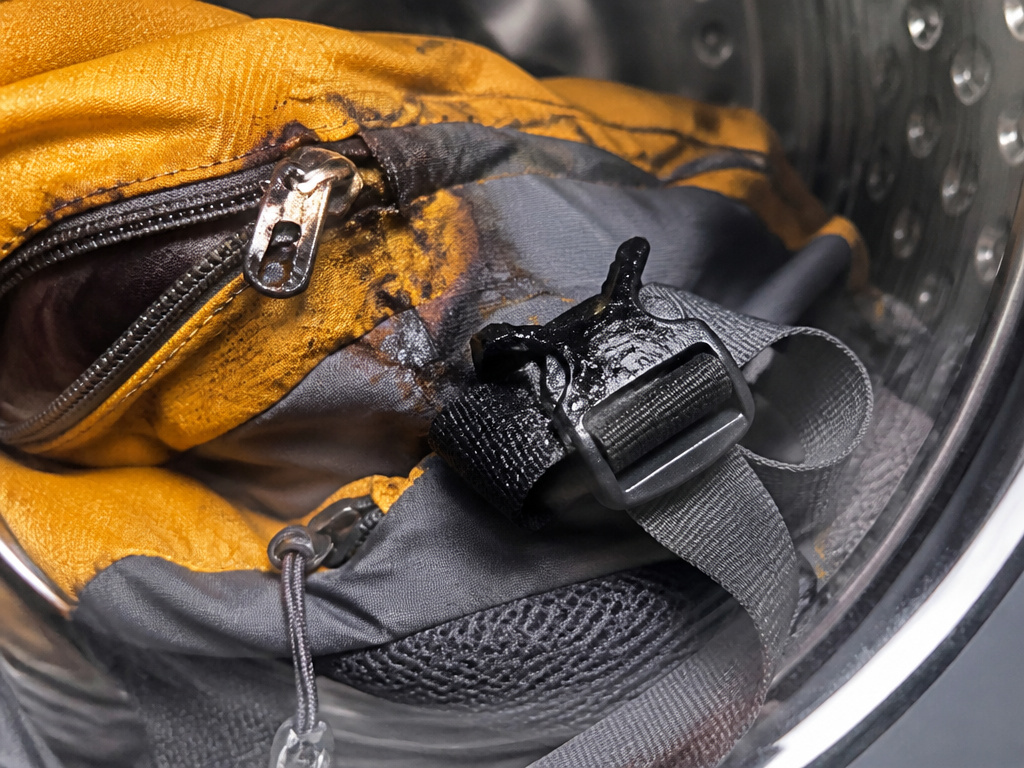
The damage follows a predictable sequence. It starts with the most heat-sensitive components.
| Component | Damage Mechanism | Visible/Tangible Consequence |
|---|---|---|
| Waterproof Coating (PU/TPU) | Melting & Cracking | Fabric loses beading effect; feels sticky or crispy; flakes off as white dust. |
| Laminated Fabrics (Dyneema) | Delamination & Shrinkage | Inner plastic layer separates from outer fabric; pack loses shape and rigidity. |
| Thread & Seams | Differential Shrinkage | Fabric shrinks, but thread doesn’t, causing puckering and seam stress. Leaks appear here first. |
| Plastic Hardware | Warping | Buckles won’t clip; zipper sliders jam; ladder-lock straps won’t hold. |
| Foam Padding | Trapped Moisture & Mold | Padding holds water, leading to internal mildew smell that never leaves. |
Common mistake: Assuming a “cool” or “air fluff” cycle is safe. The tumbling action alone is abrasive. Zippers and straps beat against the drum, fraying and weakening fabric at stress points. It’s mechanical wear you won’t see until a strap fails under load.
The timeline isn’t slow. For Dyneema, exposure to temperatures above 70°C (158°F) begins weakening the fibers. A standard dryer on low heat can hit 65°C (149°F). On medium or high, you’re well into the 80-90°C (176-194°F) range, hot enough to shrink nylon and polyester permanently after one cycle.
The Hand-Wash Process in 5 Steps (Skip the Machine Entirely)
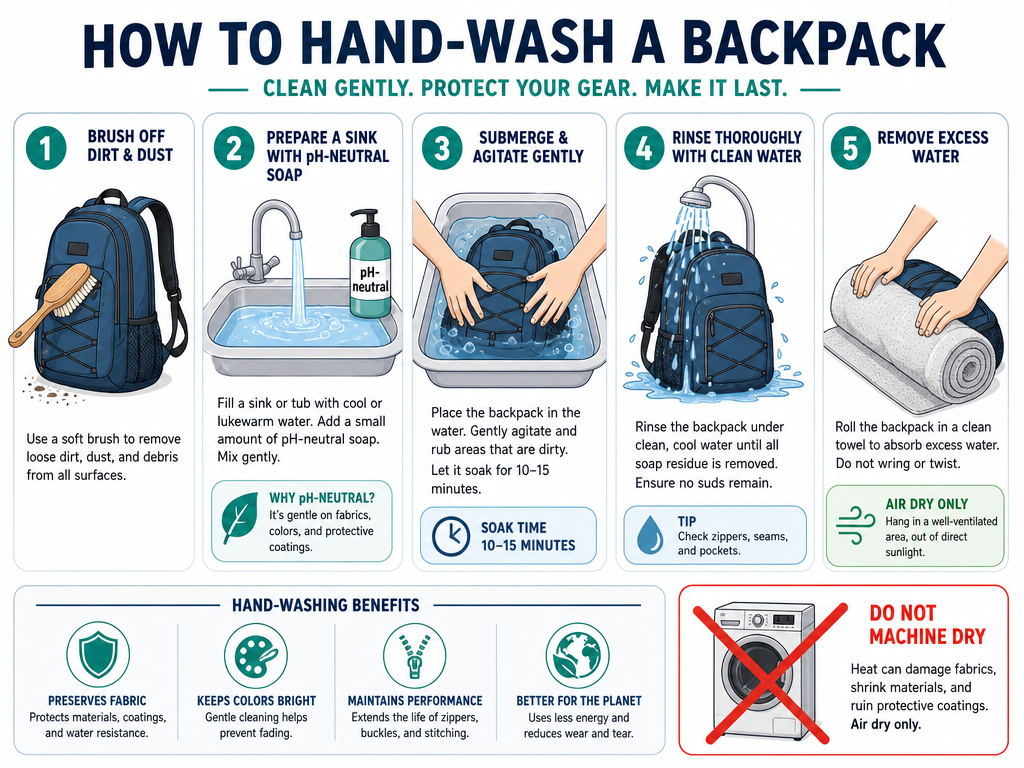
Since the dryer is off-limits, start with a proper clean that minimizes moisture. Hand-washing is the only method recommended for technical packs.
- Empty and Dry-Brush. Shake out all dirt, sand, and debris. Use a soft brush on the exterior. This prevents grinding grit into the fabric during washing.
- Prep the Sink. Fill a bathtub or large sink with lukewarm water. Never use hot water. Add a small amount of pH-neutral soap (like Nikwax Tech Wash or even a mild shower gel). Avoid detergents, softeners, or bleach.
- Submerge and Agitate. Place the pack in the water. Use your hands to gently work the soapy water through the fabric and padding. Focus on stained areas and the back panel where sweat salts accumulate.
- Rinse Thoroughly. Drain the soapy water. Refill with clean, lukewarm water and repeatedly submerge and squeeze the pack until no soap suds appear. Soap residue attracts dirt and breaks down coatings.
- Remove Excess Water. Press the pack gently against the side of the tub to push out water. Do not wring or twist. Roll it in a clean, absorbent towel to blot more moisture.
What most people get wrong: They forget the removable parts. Take off the hip belt and sternum strap if possible. Clean the rain cover separately with a damp cloth, never submerge it, as this degrades its water-resistant finish.
The Correct Way to Air-Dry Your Backpack
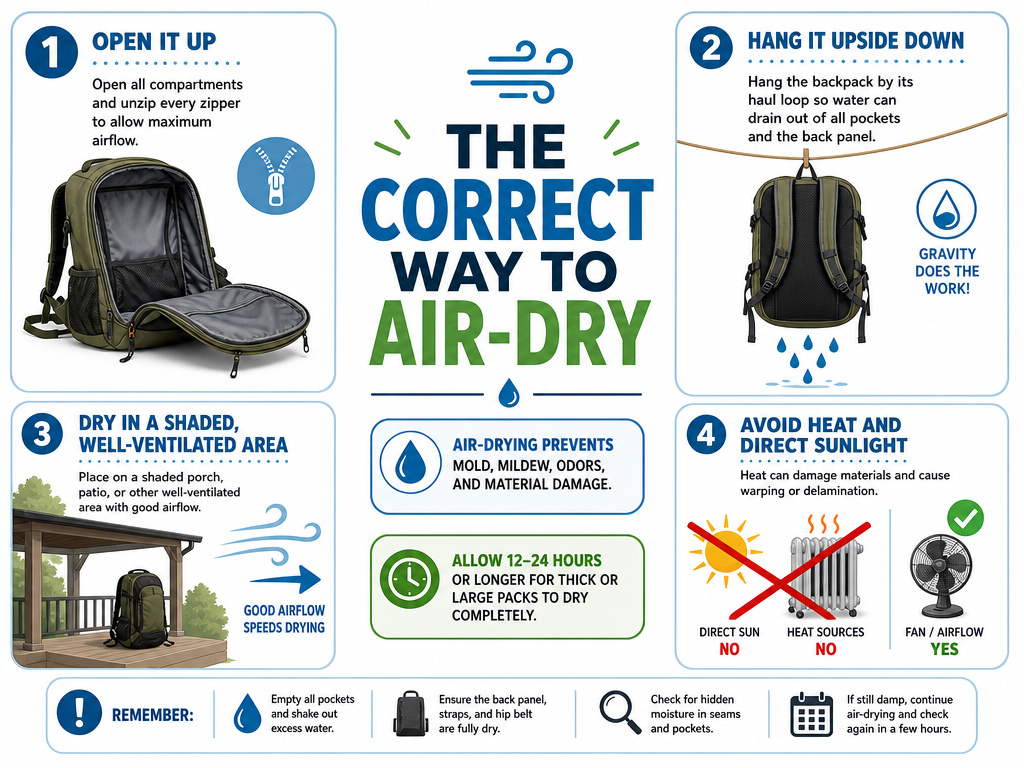
Drying is where patience matters. Rushing this step creates the same problems as the dryer: mildew and material damage.
Easy to miss: The padding in the shoulder straps and back panel holds the most water. Even when the outer fabric feels dry, these foam cores can stay damp for days, leading to a musty, permanent smell.
Follow this sequence for a completely dry pack: * Open Every Compartment. Unzip every pocket, pouch, and lid. Leave zippers fully open. * Hang Upside Down. Use a hanger or clothesline to hang the pack by its haul loop or bottom straps. The upside-down position lets water drain from the padded back panel, the deepest reservoir. * Choose the Right Spot. Place it in a shaded, well-ventilated area. A covered porch, garage with open doors, or a room with a fan is ideal. * Avoid Heat Sources. Never place it in direct sunlight, near a radiator, heater, or fireplace. UV rays degrade fabric, and concentrated heat has the same effect as a dryer.
How long does it take? A well-wrung 30-liter pack in a breezy shade can take 24-48 hours. A dense 50-liter pack with thick padding might need 3-4 days. You’ll know it’s done when you can’t feel any cool, damp spots deep in the back panel padding.
When You’ve Already Put It in the Dryer: Damage Assessment
Maybe you’re reading this after the fact. Here’s how to inspect your pack and understand the consequences.
Check the coating. Splash water on the main fabric. Does it bead up and roll off, or does it immediately soak in? Loss of beading means the DWR (Durable Water Repellent) or PU coating is compromised.
Inspect the seams. Look for puckering or wrinkled fabric along stitched lines. This is differential shrinkage, the fabric shrank, the thread didn’t. These seams are now weak points.
Feel the hardware. Do zippers slide roughly? Do buckles clip loosely? Plastic warps under heat, losing its precise shape.
Smell the padding. Put your nose close to the shoulder straps and back panel. A sour, mildewy smell trapped in the foam is nearly impossible to remove. This is why hanging upside-down is critical, it prevents the trapped moisture that causes this.
If you discover damage, the warranty likely won’t cover it. Brands like EVOC state that machine washing or drying voids the warranty. Your options are a professional gear repair service (for seam re-sealing) or re-waterproofing the fabric with a spray-on product like Nikwax TX.Direct. The structural damage, however, is permanent.
Special Cases: Dyneema, Leather, and Daypacks
The “no dryer” rule is universal, but material science changes the stakes.
Dyneema Composite Fabric (DCF) Packs are the most heat-sensitive. The laminate starts degrading above 70°C (158°F). A dryer will shrink and warp it irreversibly. Hand-wash in lukewarm water and air-dry in shade, no exceptions.
Leather-trimmed or full-leather packs are ruined by heat. Leather dries out, cracks, and loses its oils. Condition leather with a dedicated product after spot-cleaning with a damp cloth.
Simple nylon daypacks or school backpacks might survive a single low-heat cycle. But you’re still abrading the fabric, weakening seams, and melting any internal waterproofing. It’s a gamble that shortens the pack’s life. Air-drying is free and risk-free.
Frequently Asked Questions
Can you put a backpack in the washer?
Most manufacturers say no. The agitation stresses seams and coatings. If the care label explicitly permits it, use a front-loading washer on a gentle, cold cycle inside a laundry bag. Remove all straps and empty all pockets. Top-loading machines with an agitator column are particularly damaging.
How do you dry a backpack quickly without a dryer?
Speed comes from airflow, not heat. After towel-blotting, hang the pack upside down in front of a fan. Ensure the fan air circulates into the open compartments. In a dry climate, this can cut drying time in half. Never use a hair dryer or space heater.
Why does my backpack smell after air-drying?
Persistent musty smell means moisture was trapped inside the foam padding, leading to mildew. Next time, dry it upside down with a fan for longer. For the existing smell, use an enzyme-based cleaner (like those for pet odors) on the padding. Avoid dryer sheets, they mask the smell with a strong fragrance that can also degrade some fabrics.
Can the sun dry my backpack?
Direct sunlight is a poor choice. Ultraviolet (UV) radiation breaks down the molecular structure of nylon and polyester, making fabric brittle and causing colors to fade. The heat from the sun can also be surprisingly intense, replicating dryer-like damage. Use shade.
What about putting a wet backpack in a clothes dryer with no heat?
The “air fluff” or “no heat” cycle still involves tumbling. Zipper pulls, buckles, and straps will beat against the drum and each other, causing abrasion and premature wear. The mechanical action is the problem, not just the heat.
The Bottom Line
A clothes dryer is built for towels and cotton t-shirts, not for the complex material engineering of a modern backpack. The heat melts, the tumbling abrades, and the result is a pack that leaks, smells, and fails before its time.
The alternative is simple: wash by hand in lukewarm water, press out the moisture, and hang it upside down in a breezy shade. It takes longer, but it’s the only method that respects the materials and the investment you made in your gear. Your backpack is built for adventure, dry it in a way that lets it see a few more.