Learn How to Sew a Durable Duffel Bag for Gym or Travel Use
This post contains affiliate links. As an Amazon Associate, we earn from qualifying purchases.
Sewing a duffel bag requires matching three things: your machine’s power, a fabric that won’t fray, and a zipper installation method that accounts for your machine’s throat space. Use a 1/2-inch seam allowance for woven fabrics like canvas, cut your zipper two inches longer than your bag’s width, and interface every panel you want to hold its shape. Skip any of those, and the bag sags, the zipper binds, or the seams split on the third trip.
That 1/2-inch seam allowance is the difference between a seam that survives a checked-bag carousel and one that pops under a 30-pound load. Most home sewing patterns default to 5/8 inch, but on multiple layers of canvas and lining, that extra 1/8 inch crowds the needle and forces the feed dogs. Drop to 1/2 inch, and the machine feeds evenly.
What follows is the walk from picking fabric to stitching the final handle. We’ll cover which machines can handle army-duffel canvas, how to install a zipper on a machine without a free arm, and the one measurement miscalculation that leaves your side panels too small every time.
Key Takeaways
- Test your machine on four layers of your chosen fabric before you cut anything. A domestic machine like a Janome HD-1000 can sew 16oz canvas if you use a denim needle and go slow, but vinyl or multiple layers will jam a standard motor.
- Interface everything except maybe the lining. Fusible fleece adds soft structure; heavyweight woven interfacing makes the bag stand up on its own. Skipping interfacing gives you a floppy sack.
- Cut the zipper two inches longer than the bag’s finished width. The extra length gives you tabs to work with and lets you bury the zipper pull during tricky topstitching. Trimming it to exact width is the most common beginner error.
- The side panel math is non-negotiable. Calculate the radius for circular ends using the bag body’s sewn circumference, not the cut width. The formula is (Circumference / 6.28). Get this wrong, and the panel won’t attach without pleats.
- This is not a weekend project for a first-time sewer. A basic duffel with a single zipper and two handles takes a committed beginner 8-12 hours spread over three or four sessions. Rushing leads to misaligned zippers and uneven handles.
The 7-Step Bump-Feed Replacement (and the One Step Nobody Skips)
A duffel bag is a cylinder with ends. The process is linear, but one skipped prep step guarantees a frustrating finish.
Step 1: Cut and Interface All Pieces. Cut your main body, lining, side panels, and handle strips. Immediately fuse interfacing to the wrong side of every exterior piece. If you wait until after you start sewing, you’ll have to iron around seams and the adhesive won’t bond fully.
Common mistake: Fusing interfacing after sewing the first seams. The iron can’t reach the full panel, the adhesive sets unevenly, and you get bubbles that never press out.
Step 2: Construct the Lining. Sew the lining body pieces together, right sides facing, along the side seam. Leave a 6-inch gap unsewn in the middle of that seam. This is your turning hole. Set it aside.
Step 3: Install the Main Zipper. This is the make-or-break moment. Pin the zipper to the top edges of the main exterior body, right sides together. Use a zipper foot. Sew slowly, keeping the zipper tape flat. The natural tendency is to stretch the fabric; don’t. Let the feed dogs pull it through. * Open the zipper halfway before you attach it. If you sew it closed, you won’t be able to turn the bag right-side-out later. * Use a longer stitch length (3.0mm) for this seam. It’s easier to pick out if you’re off by that infamous inch.
Step 4: Box the Bottom (Optional). For a flat-bottomed duffel, pinch the bottom corners of the exterior body, match the side seam to the bottom seam, and sew across. This creates a gusset. Do the same to the lining.
Step 5: Attach the Side Panels. Pin a side panel to one end of the exterior cylinder, right sides together. Start sewing with a 1/4-inch seam allowance. Go slowly, easing the curved panel to the straight edge. It will feel awkward. When you’re halfway around, you’ll need to reach inside the cylinder to continue. Repeat for the other side.
Step 6: Assemble the Bag. Slide the lining over the exterior, right sides together. They should be nested like two tubes. Pin around the top opening. Sew all the way around. Reach through the hole in the lining and pull the entire bag right-side-out. Hand-stitch the lining hole closed.
Step 7: Add Handles and Straps. Topstitch handles in place, backstitching several times over the attachment points. This is the stress point. For bag handles, use nylon webbing or folded canvas. For a shoulder strap, use a slider buckle to make it adjustable.
The step nobody skips? Pressing every single seam after you sew it. Not tomorrow, not at the end. Right after the needle lifts. A duffel bag has too many layers for a final press to fix what’s already set.
Which Fabric Actually Holds Up?
Your fabric choice decides whether this is a gym bag that lasts a season or a travel bag that survives a decade.
| Fabric Type | Best For | Machine & Needle Required | Risk If You Choose Wrong |
|---|---|---|---|
| Cotton Canvas (10-12oz) | First projects, light-duty gym bags. | Standard domestic machine, denim needle (100/16). | Abrades at stress points within a year; loses shape when wet. |
| Heavy Canvas (16oz+) | True travel duffels, gear bags. | Heavy-duty or industrial machine, topstitch needle (110/18). | Jams and breaks needles on a standard machine; feed dogs can’t grip. |
| Vinyl / Faux Leather | Stylish, wipe-clean weekenders. | Heavy-duty machine with Teflon or walking foot, leather needle. | Needle holes become permanent perforations; seams tear under load. |
| Cordura or Packcloth | Outdoor, abrasion-resistant gear. | Heavy-duty machine, microtex needle. | Slippery; layers shift while sewing without proper basting or clips. |
| Home-Dec Weight Upholstery | Structured, boxy duffels. | Standard machine, denim needle. | Too stiff for smooth curves; side panels pucker and won’t ease in. |
The Reddit sewing community is blunt about machine limits. One user asked if their Janome HD-1000 could handle “army duffel bag materials.” The consensus: maybe, with the right needle and patience, but for daily work on 16oz canvas, you want a vintage all-metal beast or a modern heavy-duty model. Another found a 1963 Kenmore on the side of the road, serviced it, and now “sews through steel” and all their marine canvas.
For a first duffel, Premier Prints cotton twill is a safe, affordable bet. It’s a mid-weight woven that behaves under the needle. If you want a bag that stands up on its own, you need structure. That comes from interfacing.
Fusible fleece gives a soft, padded structure—good for a gym bag. Heavyweight woven fusible interfacing (like Pellon SF101) gives a crisp, board-like structure—essential for a flat-bottomed tote-style duffel. Interface the exterior fabric, not the lining. The only exception is if you’re using a slippery lining like nylon; a light interfacing stops it from bunching up.
The Zipper: Where First Projects Stumble
The zipper is a straight line until it isn’t. The two most common failures are misalignment and dealing with bulk.
I was confident and started wondering why people said zippers were difficult. Then I zipped up the two sides and saw that I was about an inch off. I was quickly humbled. — Reddit user on r/sewing, after their first duffel bag
That inch-off scenario happens when you don’t baste first. Pin the zipper, then sew a long, temporary basting stitch by hand or machine. Zip it up. Check the alignment. If it’s good, sew the permanent seam. If it’s off, you’re picking out basting stitches, not your tight topstitching.
Zipper Length Rule: Cut the zipper two inches longer than your bag body’s width. After installation, you trim the excess and seal the ends with a few zig-zag stitches or a dab of Fray Check. This gives you maneuvering room.
What if your machine doesn’t have a free arm? That narrow throat space makes sewing a zipper onto a bag cylinder nearly impossible. The Sewguide tutorial offers a workaround: fold the bag’s top edges under, press, place the zipper underneath, and topstitch from the right side. It’s less clean inside but functionally identical.
| Zipper Installation Method | When to Use It | Pro | Con |
|---|---|---|---|
| Standard (sewn into seam) | Bags with a separate top panel. | Clean, enclosed finish on the inside. | Requires precise alignment; difficult on a cylinder without a free arm. |
| Topstitch (zipper under folded edge) | Machines without a free arm; quick projects. | Forgiving; easy to adjust. | Raw edge of fabric is visible under the zipper unless you bind it. |
| Bound (with bias tape) | High-end, professional finish. | Covers all raw edges; very durable. | Adds bulk; requires skill with bias tape and a zipper foot. |
For a basic duffel, the topstitch method is the most beginner-friendly. It hides a multitude of sins.
Handles, Straps, and the Physics of Carry
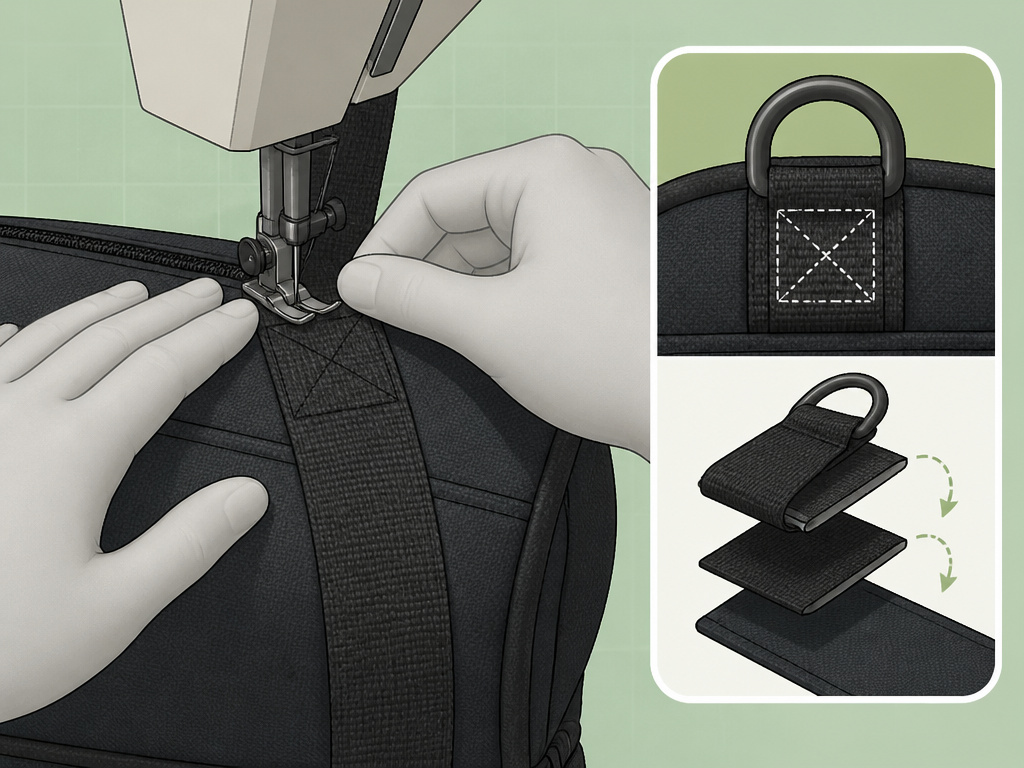 Handles are load-bearing architecture. A strap sewn with a standard 2.5mm stitch length will pull out under a full load. You need reinforcement.
Webbing is your friend. Polypropylene or nylon webbing is stronger than any fabric strap you can fold. It doesn’t need interfacing. Simply cut to length, pin in place, and box-stitch over it several times. For a detachable shoulder strap, you need hardware: slider buckles and D-rings. Sew the D-rings to the bag sides, then make a strap with adjustable tri-glides.
If you insist on fabric handles, cut them four times your desired finished width. Fold the long edges to the center, then fold again and edge-stitch down both sides. This creates a multi-layer strap that still won’t be as strong as webbing.
Where you place handles matters. Too close together, and the bag bulges when you lift it. Too far apart, and it drags on the ground. A good rule: place the ends of each handle three inches in from the side seams. This balances the load.
Where this goes sideways: Stitching handles with matching thread only. Use a heavier-duty polyester thread (like Gutermann Mara 100) for topstitching handles, even if the color doesn’t perfectly match. The strength difference is real, and the stitch line is small.
How to Modify Any Pattern for Your Stuff
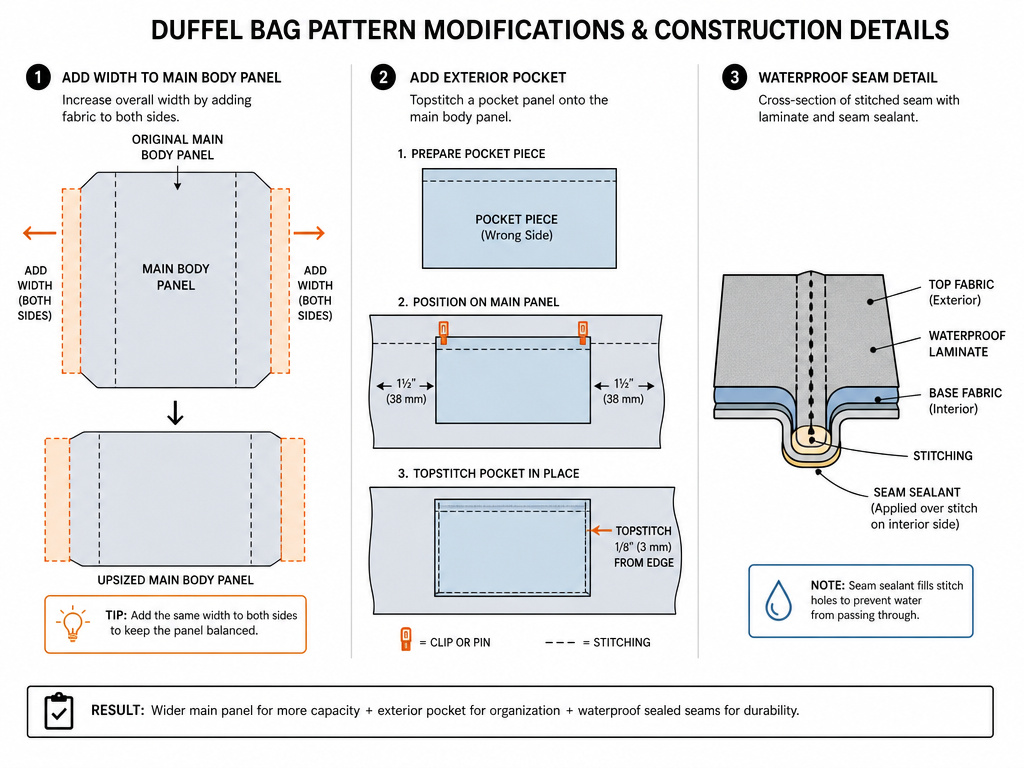 Patterns are suggestions. The MindyMakes Large Duffle pattern finishes at about 19.5″ wide and 12″ tall. The Sewspire Travel Duffel is 17″ wide and 8″ tall. Your gear dictates the size.
To upsize: Add inches to the circumference of the main body panel, not just the width. Remember, the side panel radius is (Circumference / 6.28). If you add 4 inches to the body width, the circumference increases by 8 inches, and you need to recalculate your circle.
To add a pocket: An exterior slip pocket is easy. Cut a rectangle of fabric, fold and press the top edge under, then topstitch it to the bag body before you assemble the bag. For a zippered pocket, you need to install it on the flat panel during the cutting/interfacing stage.
To make it waterproof: Use a waterproof laminate fabric (like XPac or a vinyl-laminated cotton) and seam seal the stitches with a liquid sealant. Or, sew a removable liner from a lightweight waterproof nylon.
The goal is a bag that fits your life. A duffel for hiking needs compression straps. A gym bag needs a vented wet pocket. A travel duffel needs a trolley sleeve to slip over a suitcase handle.
Frequently Asked Questions
What kind of sewing machine do I need to sew a duffel bag?
You need a machine that can sew through at least 4 layers of mid-weight canvas. A modern heavy-duty model (like a Janome HD-3000 or a Singer 4423) or a vintage all-metal machine (like a 1970s Kenmore) will work. Standard lightweight machines will struggle, jam, or break needles on thicker fabrics or over seams.
How much fabric do I need for a duffel bag?
For a medium-sized duffel (around 18″ long), you typically need 1 to 2 yards of 54″ wide exterior fabric and the same amount of lining. The exact amount depends on the pattern. The Sewspire travel duffel calls for 2 yards of cotton twill total. Always buy an extra 1/4 yard to account for mistakes or pattern matching.
Can I sew a duffel bag without a pattern?
Yes, but you must be precise with your math, especially for the circular end panels. You can draft a basic pattern using your desired length, height, and depth. The main body is a rectangle. The side panels are circles whose radius you calculate from the finished body circumference. For a first-timer, a free pattern like MindyMakes’ provides a crucial safety net.
How do you sew a zipper on a round duffel bag?
The easiest method for a round bag (a cylinder) is the topstitch method if your machine lacks a free arm. Finish the top edge of the bag cylinder, fold it to the inside, press, and slip the zipper underneath. Then topstitch the zipper in place from the right side, sewing through all layers. This avoids wrestling the cylinder under the needle.
What is the best thread for sewing a duffel bag?
Use a high-quality polyester thread (Gutermann or Mettler) for general construction. For topstitching handles and stress points, use a heavier topstitching thread (Gutermann Mara 100) in the needle, with your regular thread in the bobbin. This provides extra strength without requiring a machine adjustment for thicker thread in the bobbin case.
Before You Go
Sewing a duffel bag teaches you more about your machine and patience than a dozen simple projects. The win isn’t just a bag; it’s knowing you can build something tough enough to throw in a trunk or check at the airport.
Start with cotton canvas and a free pattern. Interface every piece. Baste your zipper. Press every seam as you go. That’s the sequence. The first one will take you a weekend. The second will take an afternoon.
The fabric store is full of potential. Walk past the quilting cotton. Go feel the canvas, the twill, the Cordura. That’s where real bags are born.