How to Repair Luggage Handle | The Right Replacement Parts
This post contains affiliate links. As an Amazon Associate, we earn from qualifying purchases.
To repair a luggage handle, you need the exact replacement part and the right tools. The process is removing mounting screws, detaching the old handle, and installing the new one. For telescopic handles, find the top and bottom mounts inside the case. For carry handles, you’re often dealing with a pin-and-post system. Mismatched parts won’t fit, and using the wrong tool strips soft aluminum screw heads.
That mismatch is where most attempts fail. A generic “luggage handle” from a hardware store almost never aligns with the specific mounting holes and tube length of your suitcase. The repair isn’t about force; it’s about matching three things: the handle type, the mounting system, and the manufacturer’s specific disassembly method.
What follows is the breakdown. We’ll cover how to identify your handle type, the non-negotiable tools, and the step-by-step for both telescopic and top carry handles. You’ll also see where the manufacturer’s own repair guides add critical details most summaries skip.
Key Takeaways
- Match the part exactly. A replacement telescopic handle must have the same tube length and screw-hole pattern as the original. Generic handles fail.
- External vs. Internal handles remove differently. A telescopic handle mounted on the outside of the suitcase pulls off from the back. An internal one pulls out from the top.
- Keep every screw and tiny part. Screws often differ in size between top and bottom mounts. Early model Bellroy carry handles have reinforcement plates you must reinstall.
- The right tool prevents damage. A 2.4 mm push pin (for Peli cases) or a proper hex key (for Bellroy) is mandatory. A makeshift tool will mar the finish or break the pin.
- Test the mechanism before final assembly. Extend and retract a telescopic handle several times after loosely fitting it to ensure the button and tubes move freely.
The Two Handle Types: Telescopic vs. Carry
Head design changes the entire process. Look at the business end of your luggage.
A telescopic handle (the pull-out trolley handle) uses two thin metal tubes that slide within the suitcase shell. It’s controlled by a push-button mechanism. Failure points are the button itself, the internal locking rods, or the tubes bending. A carry handle (the top or side grab handle) is a static piece anchored by screws or a metal pin. It usually fails from the plastic cracking or the anchor points tearing out of the shell.
Telescopic handles have multiple parts, increasing the risk of damage due to wear and tear. Fortunately, the luggage repair techniques for most bag handles are easy to follow. – Travelpro Luggage Repair Guide
The repair approach for each is fundamentally different. A telescopic handle replacement is a full disassembly of the internal system. A carry handle repair is often a straightforward swap of a single component. Getting this identification wrong means you order the wrong part and waste an hour before realizing nothing lines up.
| Handle Type | What It Is | Common Failure | Repair Complexity |
|---|---|---|---|
| Telescopic | Retractable pull handle | Stuck button, bent tubes, loose screws | Medium-High (full internal access needed) |
| Carry Handle | Fixed top/side grip | Cracked plastic, torn anchor points | Low-Medium (direct screw/pin replacement) |
Tools and Parts You Actually Need
This isn’t a job for a random screwdriver from the junk drawer. Suitcase frames use soft alloys, and the screws are often non-standard.
You need a magnetic-tip Phillips screwdriver in multiple sizes. The magnet holds screws in place when working in deep, awkward compartments. A set of hex keys (Allen wrenches) is non-negotiable for brands like Bellroy that use socket-head screws. For Peli cases and any handle secured by a roll pin, the official manual demands a 2.4 mm diameter push pin and a small hammer. Using a nail or a punch that’s too large will deform the pin and the handle housing.
The part is everything. This isn’t a suggestion.
I tried to fit a generic “universal” telescopic handle onto a mid-range spinner. The tube length was off by an inch and the screw holes missed the mounts by a quarter inch. The case was unusable for two weeks while I waited for the correct OEM part.
Brands like Briggs & Riley sell specific repair kits. The Baseline Large Carry Handle Repair Kit (ACC-9612) includes the handle, posts, plates, and screws for models made from 2008 to March 2022. Bellroy sells direct replacements for the Transit Telescopic Handle and Transit Grab Handle. These kits guarantee fit. Searching your suitcase’s model number alongside “replacement handle” is the only reliable path.
Where this goes sideways: Assuming all Phillips screws are the same. The #1 and #2 Phillips bits look similar, but using the wrong one will cam out and strip the screw head in three seconds. Test the fit before you apply torque.
How to Replace a Telescopic Luggage Handle
This is a full interior job. Start by fully emptying the suitcase and laying it flat on a table.
Step 1: Locate and Access the Mounting Points.
Open the case and look for the fabric liner covering the handle area. You’ll often find Velcro or snaps. Gently peel this back to reveal the top mounting bracket, usually located near the carry handle. The bottom mount is deeper, sometimes near the wheel well. On some hard-shell cases, the top carry handle and telescopic handle share a mount. You must remove the carry handle first to access the telescopic handle screws.
Step 2: Remove the Screws (and Keep Them Organized).
Use the correct screwdriver to remove all screws from the top bracket. Place them on a tray or stick them to a piece of tape in the order they came out. They are often different lengths. Move to the bottom mount and repeat. The Travelpro guide notes that sometimes these screws “won’t come out completely” – loosening them enough to free the bracket is fine.
Step 3: Remove the Old Handle.
With all screws removed, grasp the handle grip and gently pull the entire assembly up and out of the suitcase shell. If it’s an external telescopic handle (tubes visible on the suitcase back), you pull the whole handle assembly off the back of the case after unscrewing the mounts.
Step 4: Install the New Handle.
Feed the tubes of the new handle down through the suitcase shell, guiding them through the top and bottom mounting brackets. This takes patience. Wiggle it until the screw holes on the handle align perfectly with the holes in the brackets. Do not force it.
Step 5: Reinsert Screws and Test.
Start by threading the screws back into the bottom bracket by hand. Then do the top. Once all are started, tighten them sequentially, alternating sides to avoid pulling the handle out of alignment. Before you replace the fabric liner, test the button. Extend and retract the handle 5-6 times. It should click into place smoothly and retract fully.
How to Replace a Top Carry Handle
This is usually simpler, but attention to detail matters more. A missing reinforcement plate means the handle rips out on the first heavy lift.
For Screw-On Handles (like Bellroy):
- Lift the interior fabric liner to expose the handle’s internal fixings.
- Use the provided hex key to remove the two exterior screws (one at each end). For early Carry-On models, you will now see a small, curved reinforcing part beneath each screw. Remove these and set them aside.
- On the outside of the case, align the new handle with the 6 screw holes (2 outside, 4 inside). Keep it flush against the shell.
- Place the end caps on the exterior. The cap with the logo goes on the right.
- Inside, if you have them, align the reinforcement parts over the interior screw holes.
- Fasten the interior screws, then the exterior screws. Do not overtighten.
For Pin-Secured Handles (like Peli):
This requires the specific tool. The Peli Case Repair Instructions (Rev. 1.0) are explicit. 1. Turn the case on its side. 2. Using a 2.4 mm push pin and a small hammer, punch the existing handle pin out from the inside until the knurled end protrudes. 3. Use wire cutters to grip and remove the pin. 4. Insert the new handle, orienting it so the ejector pin markings face the case. 5. Insert the new pin with the fettered (flared) side facing outward. 6. Tap it in flush with a hammer, avoiding marks on the handle.
Common mistake: Discarding the reinforcement plates on early-model Bellroy handles. Without them, the screw threads pull straight through the suitcase’s inner plastic frame within a dozen uses. The handle will detach, often at the airport curb.
When a Full Replacement Isn’t Needed: Quick Fixes
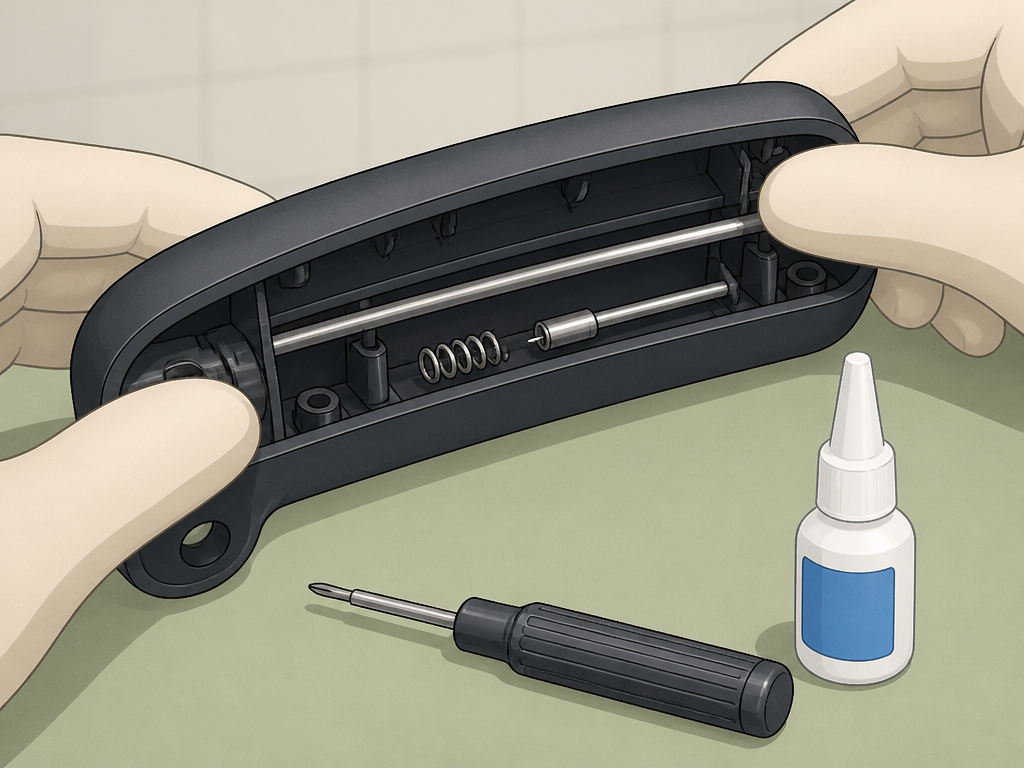 Not every handle failure needs a new part. Try these first.
A Stuck Telescopic Button: The button itself can get jammed with grit or a broken plastic tooth. After removing the handle assembly (as in Step 3 above), you can often disassemble the grip housing by prying off plastic covers. Inside, you might find a broken spring or a misaligned metal rod. The Travelpro guide suggests a dab of super glue can reassemble a cracked button—let it dry for 30 minutes before reassembly.
A Loose or Wobbly Tube: This is almost always a loose mounting screw. Tighten the screws at the top and bottom brackets. If the wobble persists, the tube itself may be bent. You can sometimes gently straighten it with padded pliers, but a bent tube will never slide smoothly again.
A Squeaking or Grinding Retraction: This is a lubrication issue. Extend the handle fully and apply a dry silicone lubricant to the exposed tubes. Work it in by extending and retracting several times. Never use WD-40 or oil; they attract dust and turn into grinding paste.
Finding the Right Replacement Part
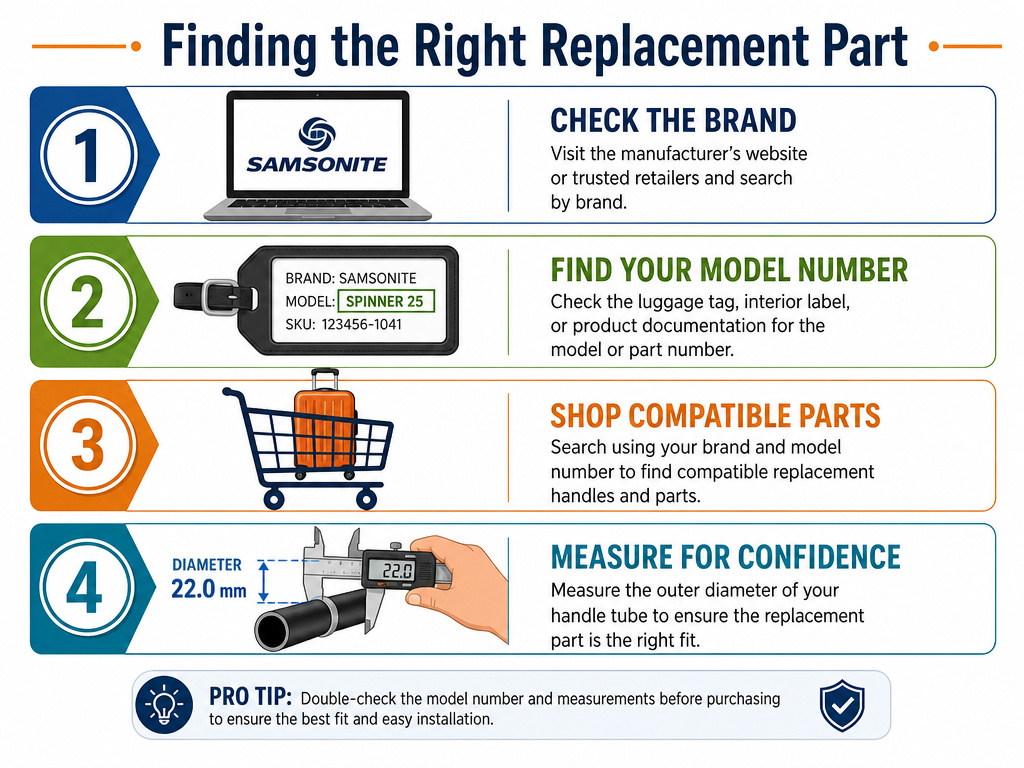 This is the step you cannot fake. Your options, in order of reliability:
- Manufacturer’s Repair Kit or Parts Store. Go directly to the brand’s website. Briggs & Riley, Travelpro, Bellroy, and Away all sell official parts. For a Peli case, download the official PELI-case_repair_instructions_wr-1670-03_1670.pdf and use the part numbers listed.
- Model-Specific Search. Find the exact model number of your suitcase (on a tag near the handle or inside the lid). Search “[Brand] [Model Number] replacement handle.”
- Specialist Retailers. Sites like Suitcase-Repair.com inventory handles for many common brands and models. They match by your suitcase’s model number.
- Measure Your Old Handle. If all else fails, remove the broken handle. Measure the tube diameter, the distance between mounting holes (center-to-center), and the total extended length. Use these specs to search.
The Briggs & Riley Baseline kit is a perfect example: it’s only for Baseline styles from 2008–March 2022. A 2023 model uses a different part. That specificity is the difference between a 20-minute fix and a returned part.
Frequently Asked Questions
Can I fix a luggage handle without a replacement part?
Only for very specific, minor issues. You can re-glue a cracked carry handle button or tighten loose screws. If the plastic is shattered, the metal tube is bent, or the locking mechanism is broken, you need a new part. There is no durable fix for structural damage.
How much does it cost to repair a luggage handle?
It depends entirely on the brand and part availability. An official replacement handle kit from a premium brand can be a significant investment. A generic handle from a third-party site costs less but risks a poor fit. The repair itself is free if you do it, but a professional luggage repair service adds labor costs.
Is it worth repairing an old suitcase handle?
Yes, if the suitcase itself is otherwise in good condition—especially if it’s a quality model from a brand like Briggs & Riley or Travelpro that’s built to last decades. Replacing a $30 handle on a $400 suitcase is obvious. Repairing a handle on a cheap, worn-out suitcase you’ve had for ten years is less sensible.
What if I can’t find the exact replacement handle?
Your options narrow. Contact the manufacturer’s customer service directly with your model number; they may have old stock. Search eBay or other second-hand markets for “for parts” luggage of the same model. As a last resort, a professional luggage repair shop may have a bin of salvaged parts or the ability to modify a similar handle.
Can duct tape fix a broken luggage handle?
As a very short-term, travel-emergency patch, maybe. The YouTube fix involves taping the push button inward to keep it retracted. It might get your bag home. It is not a repair. The tape will fail under stress, and you risk the handle extending unexpectedly.
Before You Go
Repairing a luggage handle is a test of patience and precision, not strength. The victory is in the details: matching the part, using the right 2.4mm push pin or hex key, and keeping track of every screw and reinforcement plate.
For a telescopic handle, remember the difference between internal and external mounting. For a carry handle, follow the manufacturer’s orientation to the letter. Skip the generic hardware store handles. Invest the time in finding the exact OEM part or a verified model-specific replacement.
A successful repair extends the life of a trusted travel companion. It also proves the bag’s worth—a piece worth fixing is a piece built to last. Now you have the steps to get it done.